


TH16 Quad Heroes Strategy Guide
A Clash of Clans Guide

Hi, I’m Leo.
I play for United 5 — a Clash of Clans esports team based in the United States. In total, I’ve competed in over 50 matches, including one that was live-streamed to over 4,000 people. And I’ve hit rank #1 global with Quad Heroes in Legend League.
You’re reading the 3rd edition of the guide. I periodically update it after major updates and balance changes.
Updates:
+ Ssip Chang Fa Ball technique 🔥
+ Earthquake Boots
+ 3 new replays
Let’s begin…
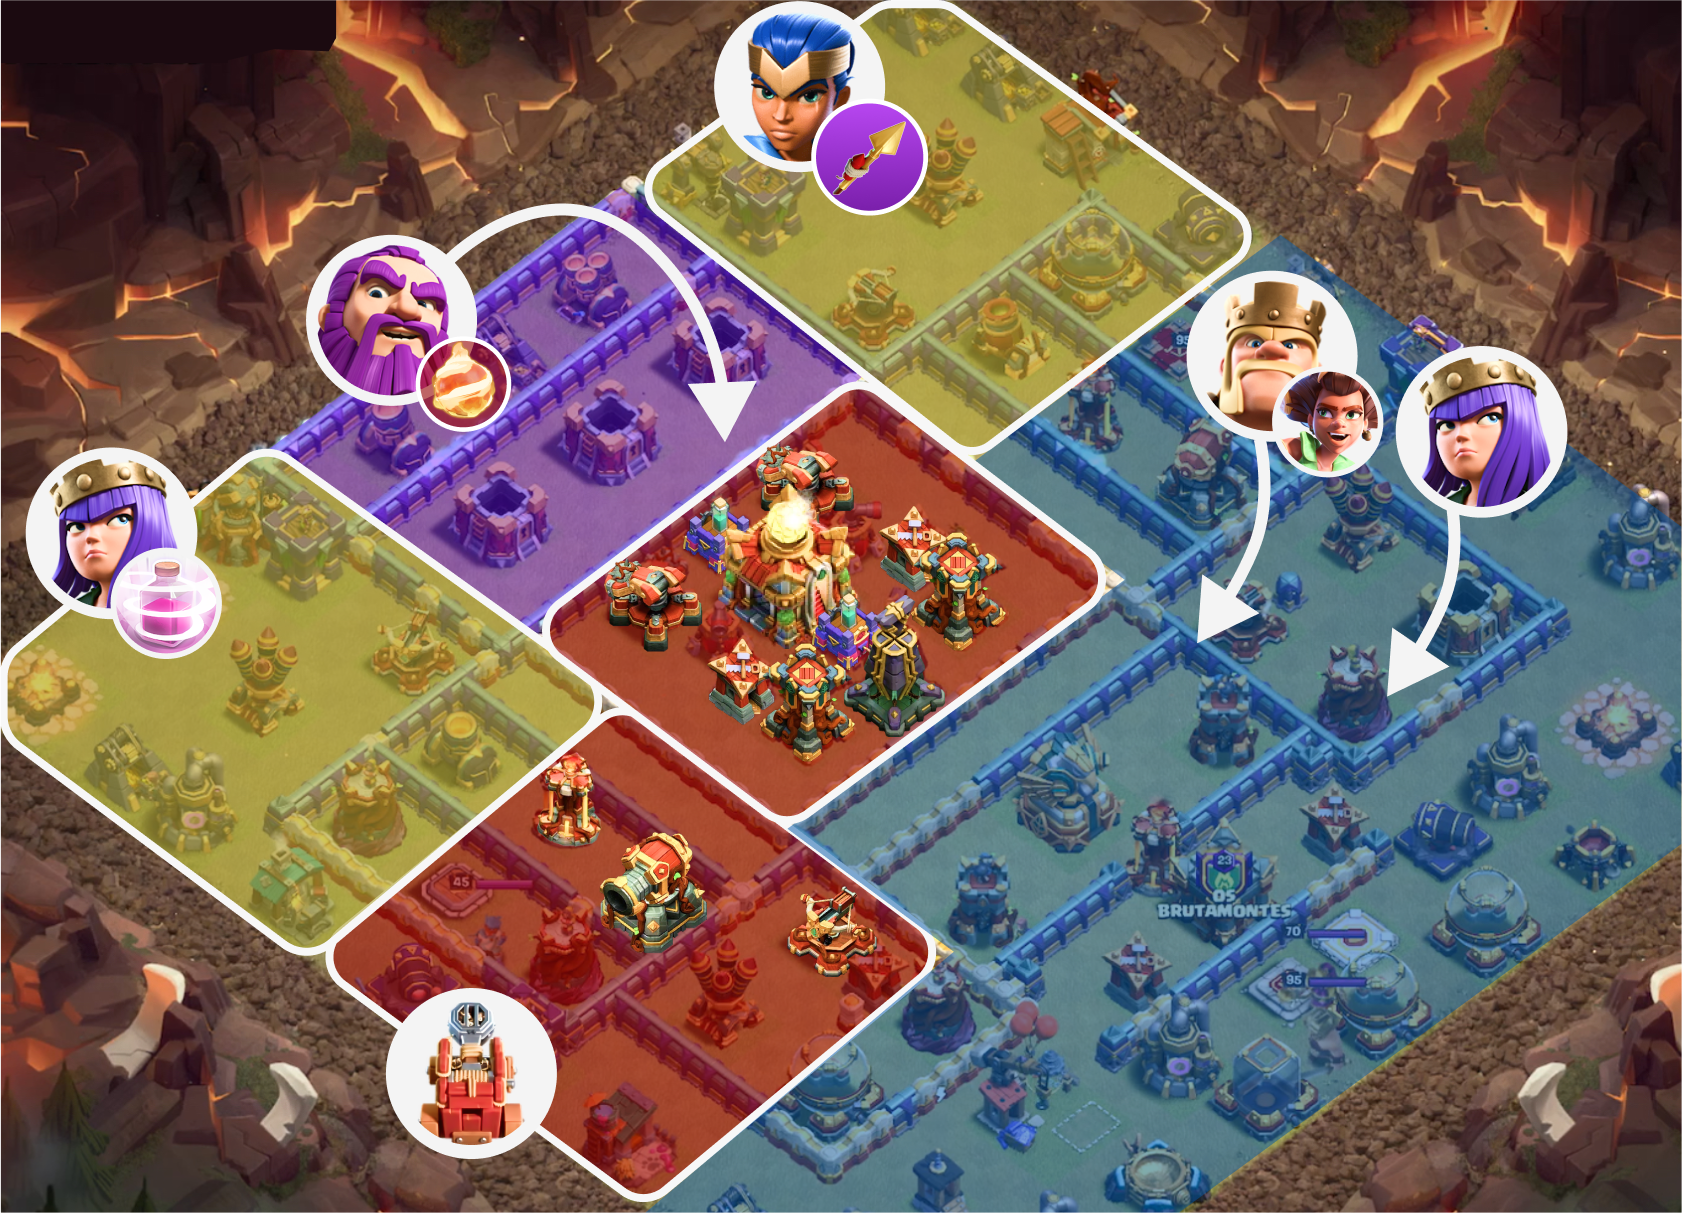
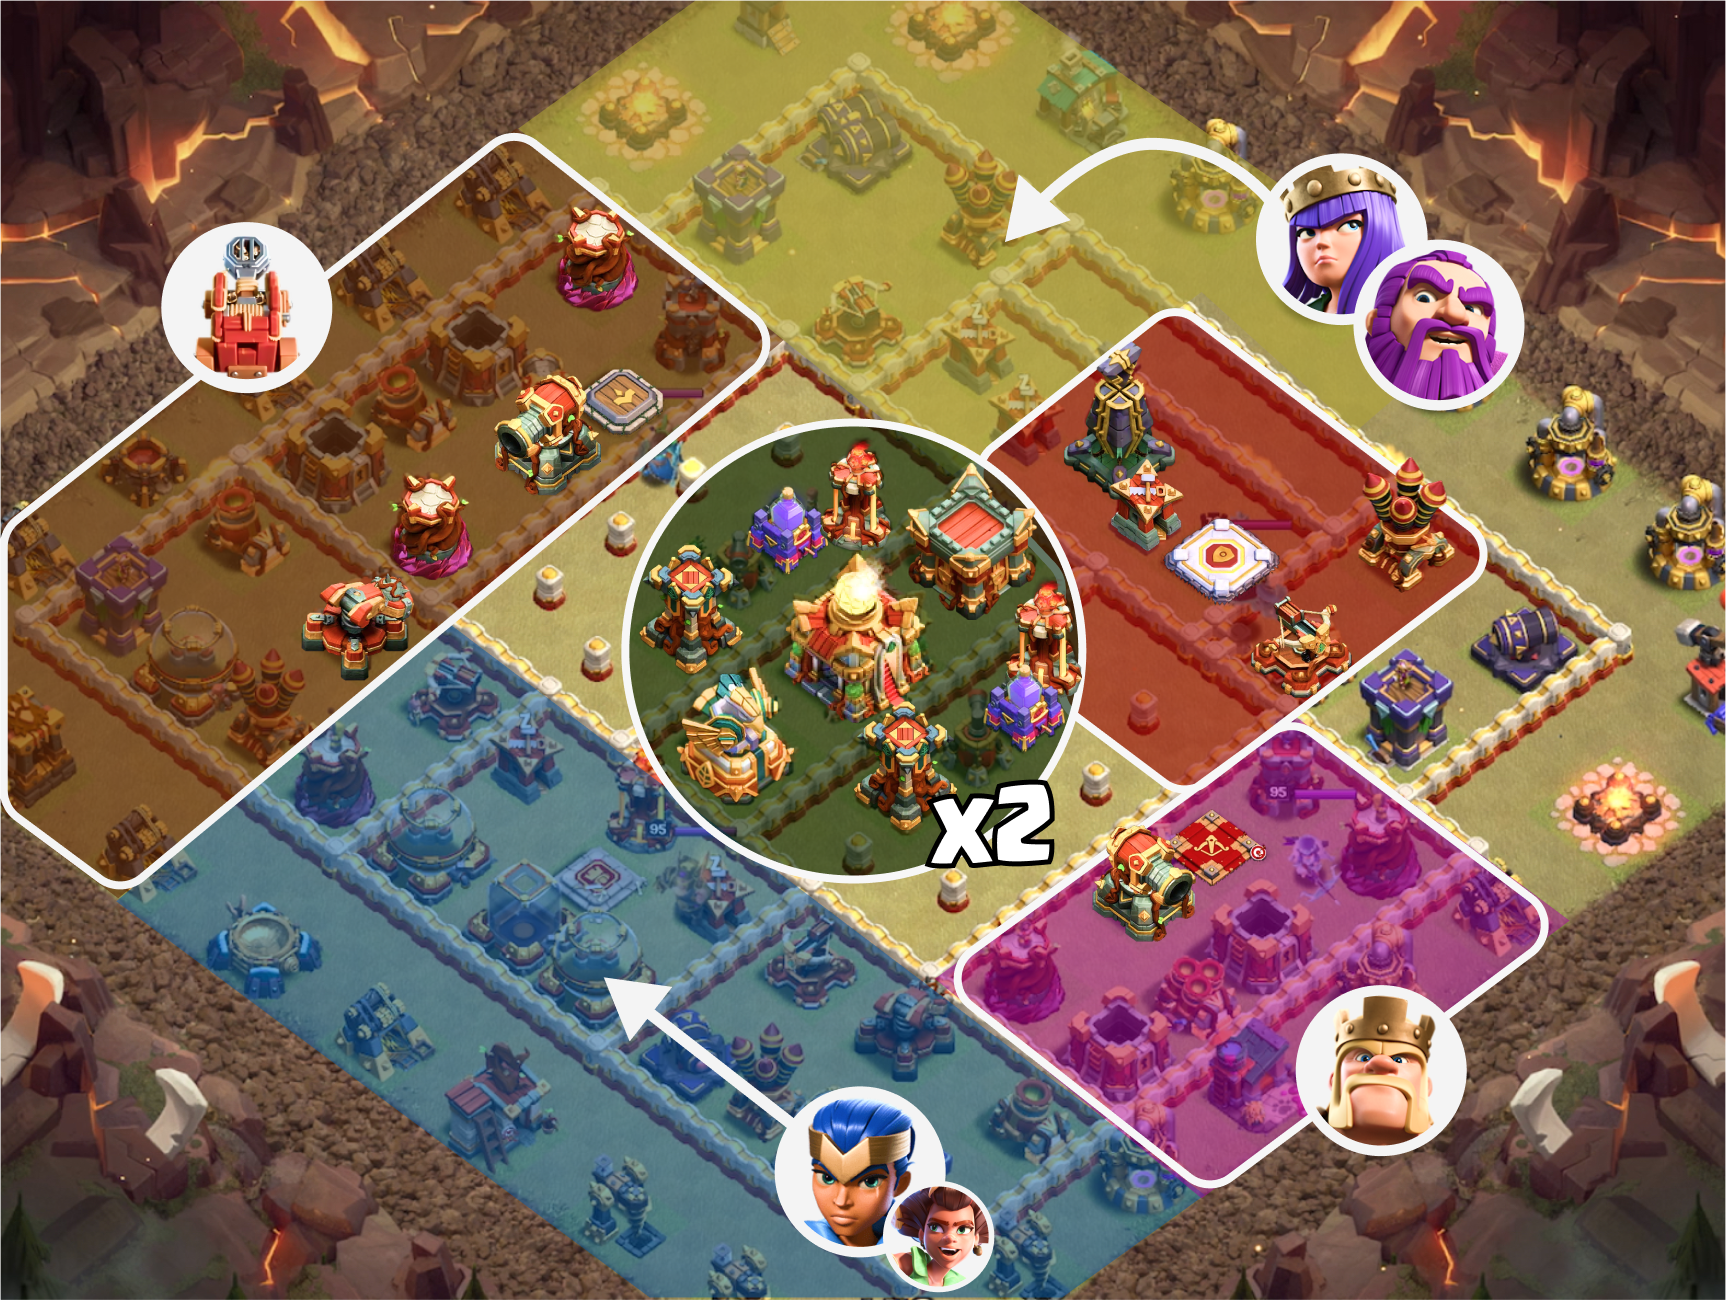
"Quad Heroes" is a multi-phase strategy that’s about optimizing hero value. It includes two hero charges, damage equipment, and a powerful ground army. I coined the name “Quad Heroes” as you’re often deploying your heroes on four separate corners of the map, and watching them hilariously converge in the middle.
See it in action:
Proof that it’s 🔥:


Quad Heroes has three phases*:
Phase 1: Warden Walk + Fireball:
Set up a fireball on a portion of the base. Preemptively destroy a few major defenses before they become an issue, and set up a funnel for the rest of your army.
Phase 2: Queen Walk + Recall
Finesse a queen walk on the perimeter of the base. Scoop up outer buildings and recall her before she gets caught in heavy fire.
Phase 3: King + Ground Smash*
Send in your king, re-deployed queen, ground troops, and royal champion to bulldoze through the rest of the base.
"Smash" refers to big, beefy troops moving through the base.
Intermediate clashers should be familiar with the concept of a multi-phase attack. Any strategy that revolves around a queen walk usually has two phases (the queen walk, followed by the main army). Some can have more. Blizzard lalo has three phases (blimp, followed by a hero dive, followed by the lalo).
The flow of the attack (measured in time remaining):
Warden Walk (start to end)
Flame Flinger (first ~1m30s)
Queen Walk + Recall (in the first 1m for ~45s)
Redeployment of Queen (middle to end)
King + Smash + Royal Champion (middle to end)
These estimates vary depending on the attack, but hopefully they give you a sense of what happens when.
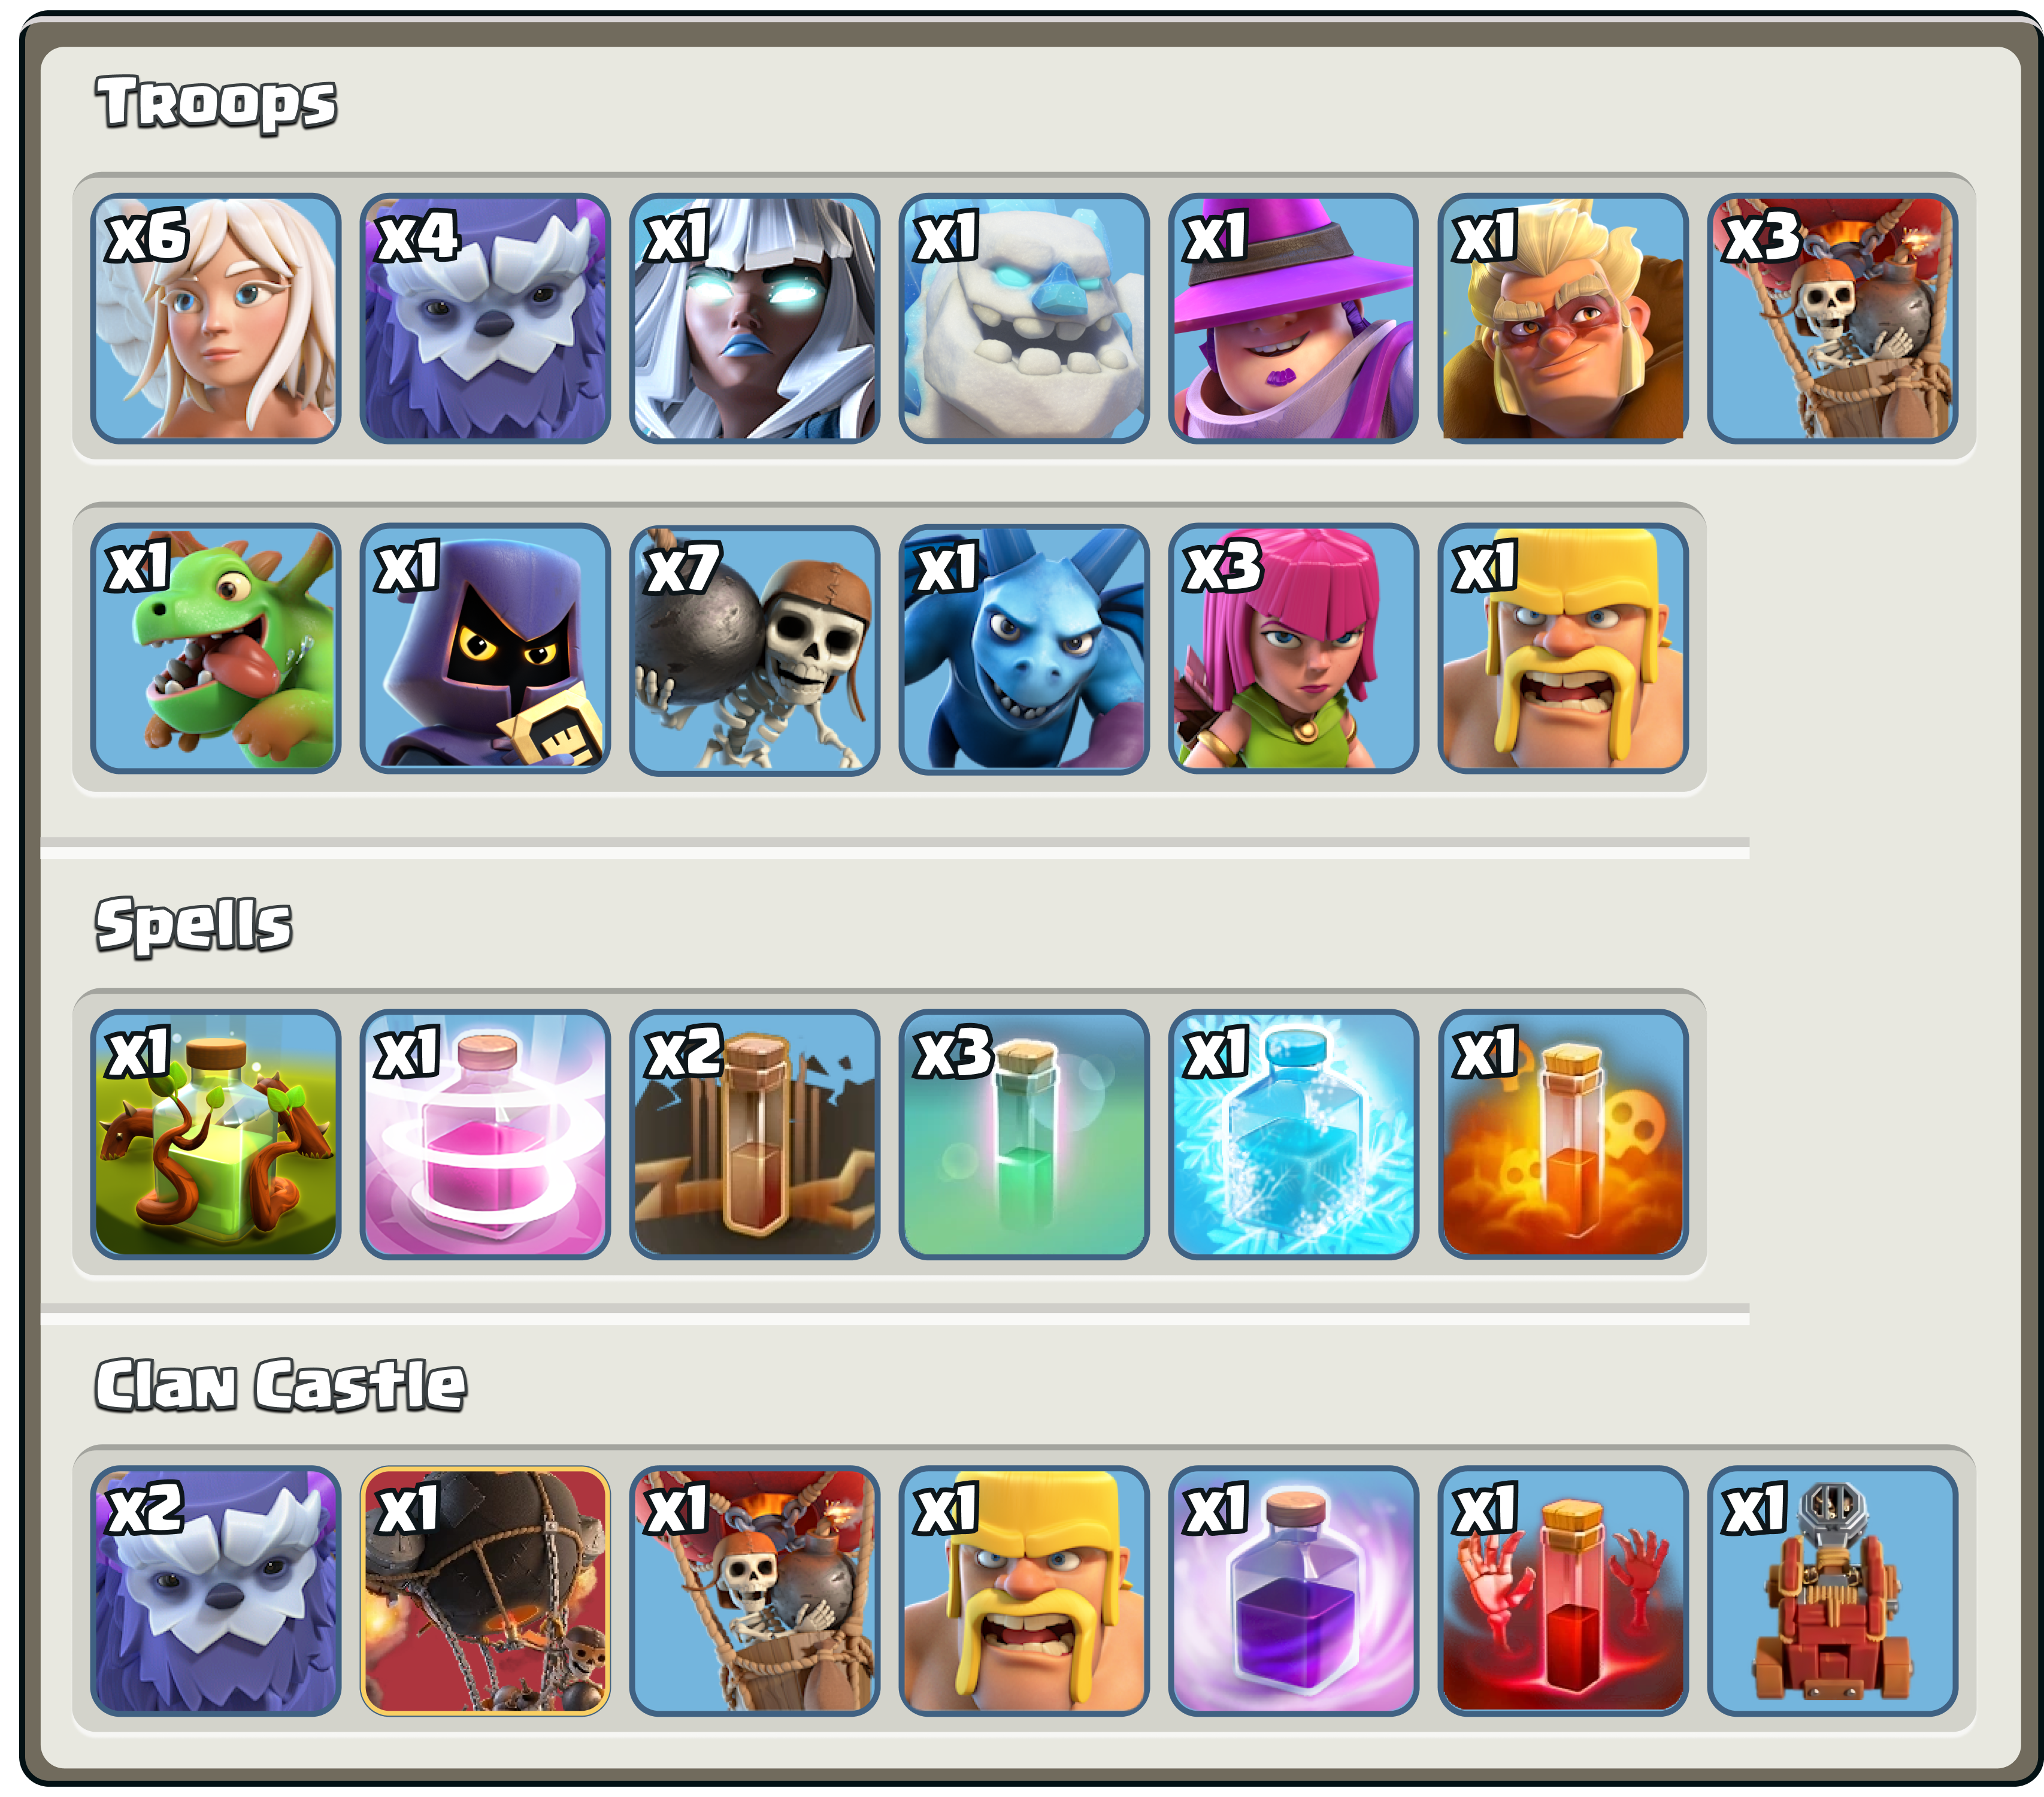
Try it for yourselves. Here’s the army link:
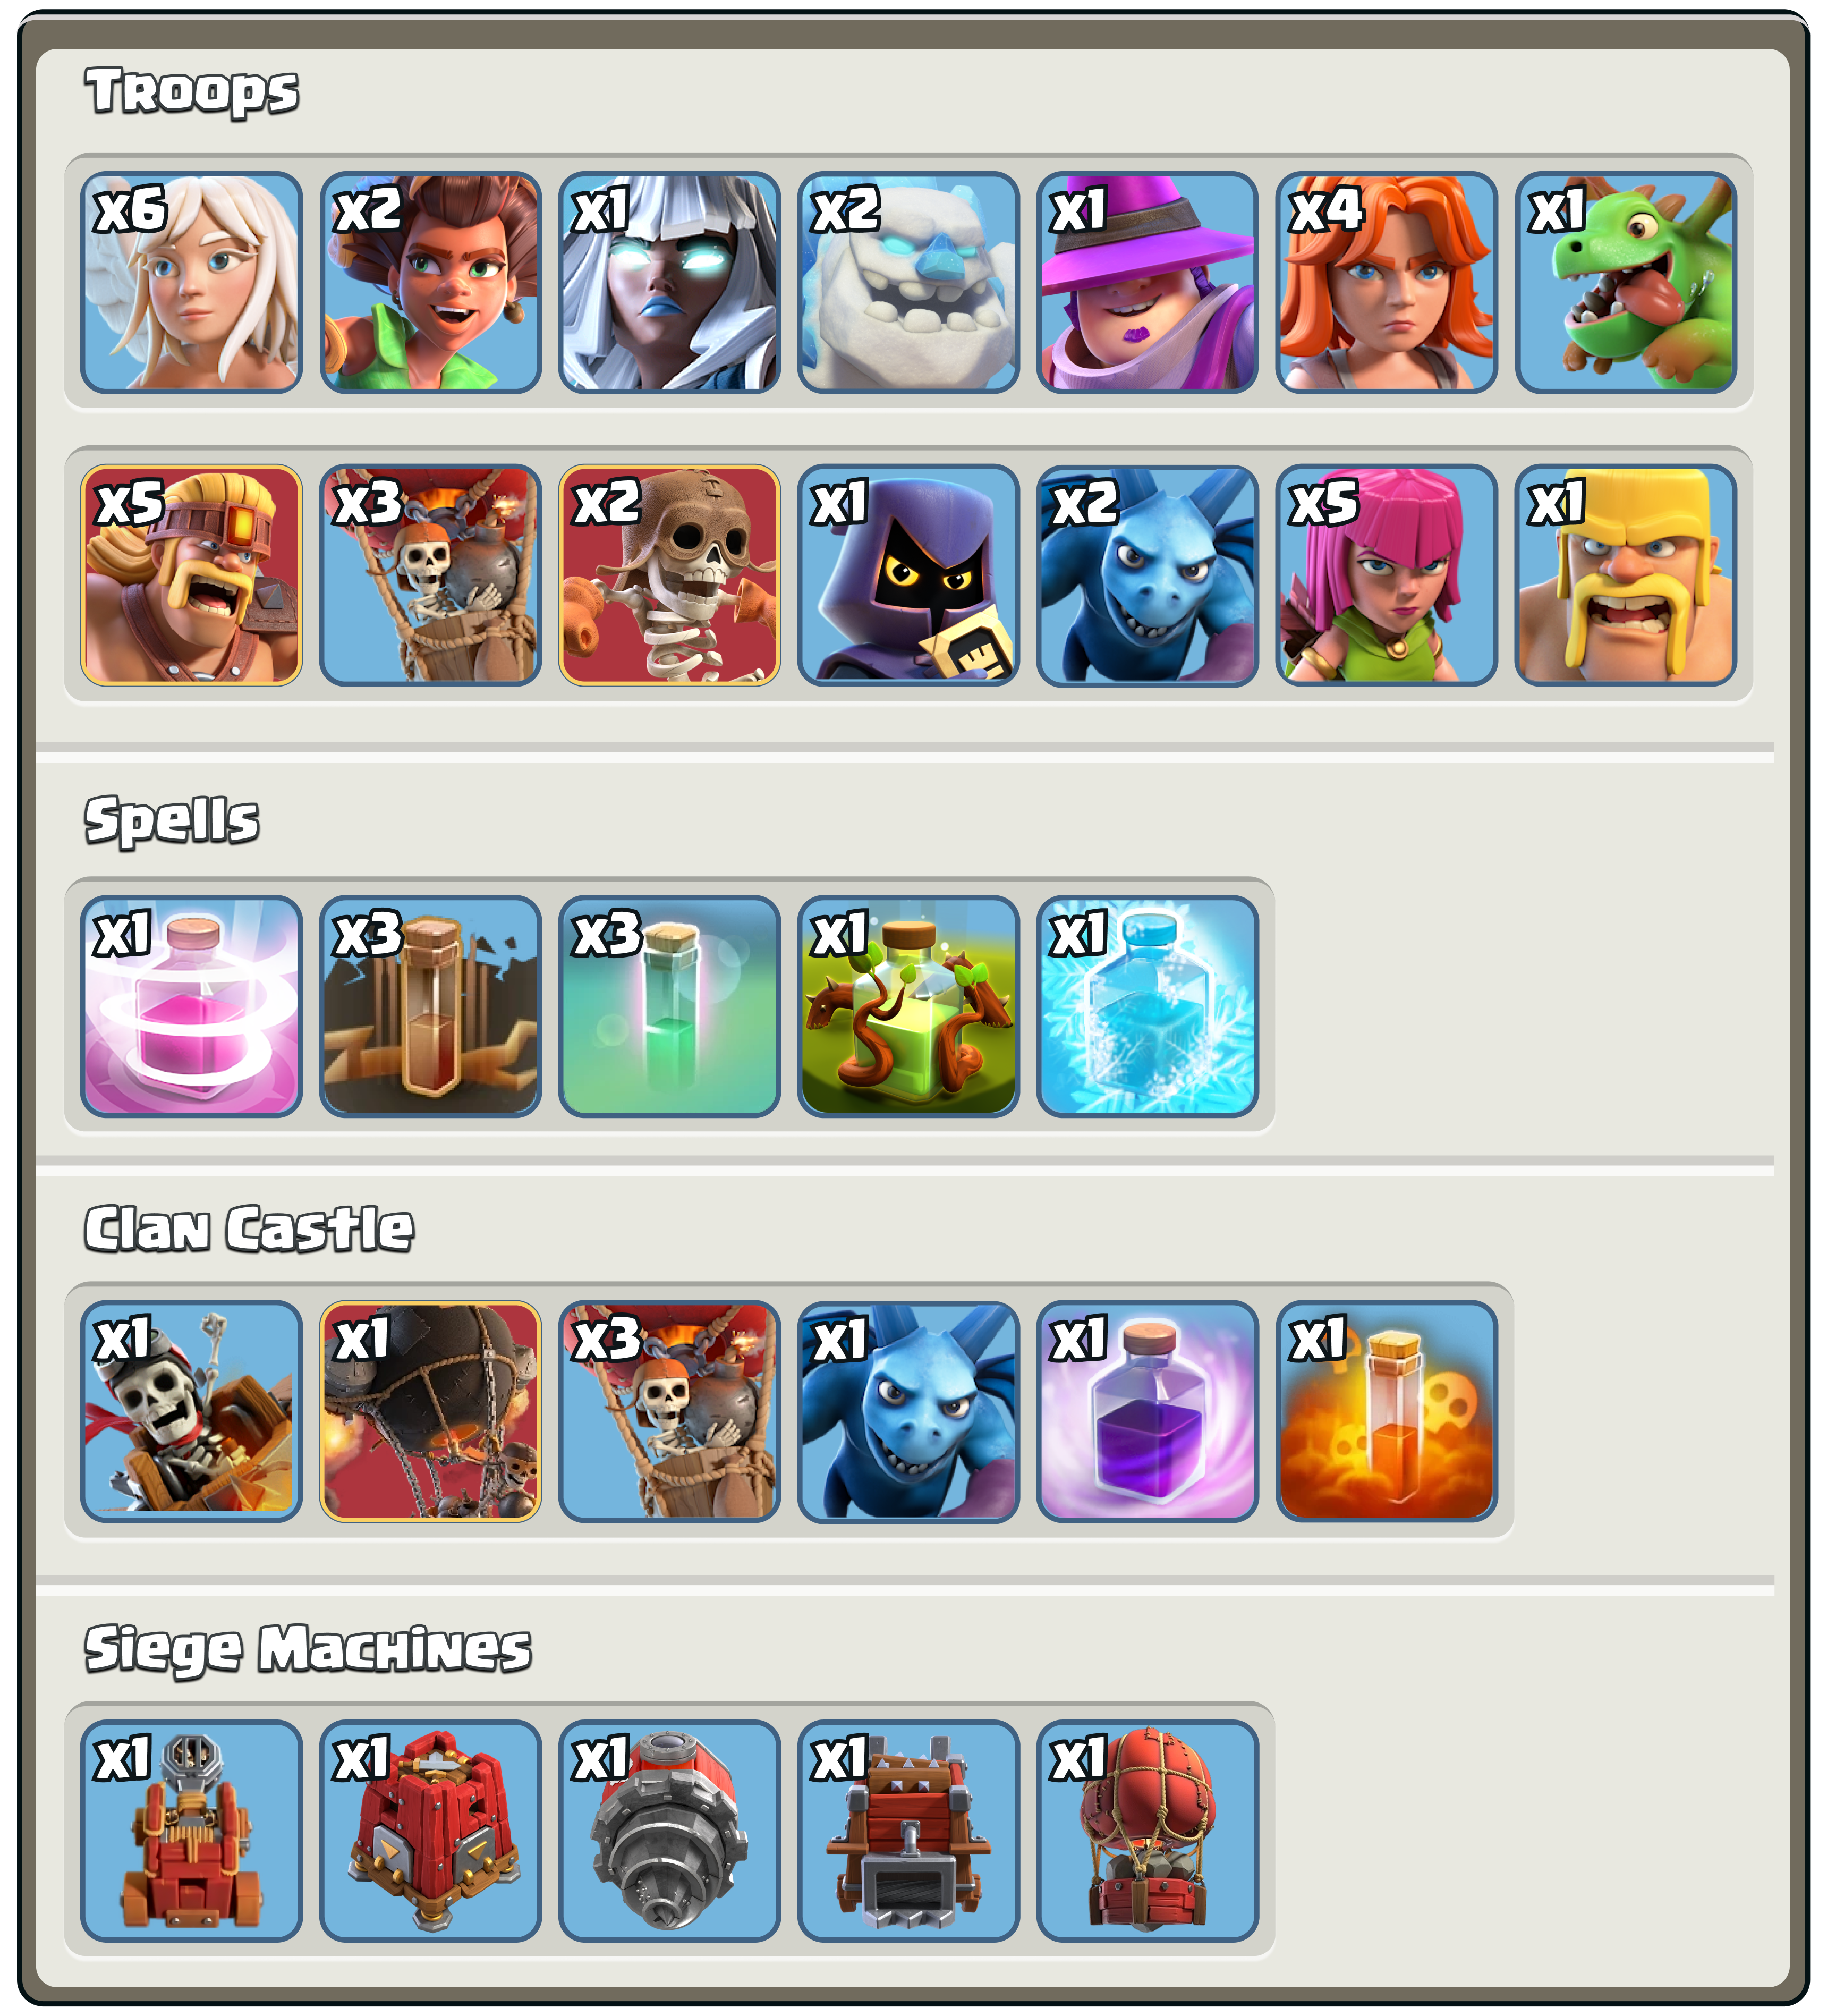
Hero Equipment + Pets
King:

Queen:

Warden:

Royal Champion:

Breaking Down The Army:
Phase 1: Warden Walk + Fireball
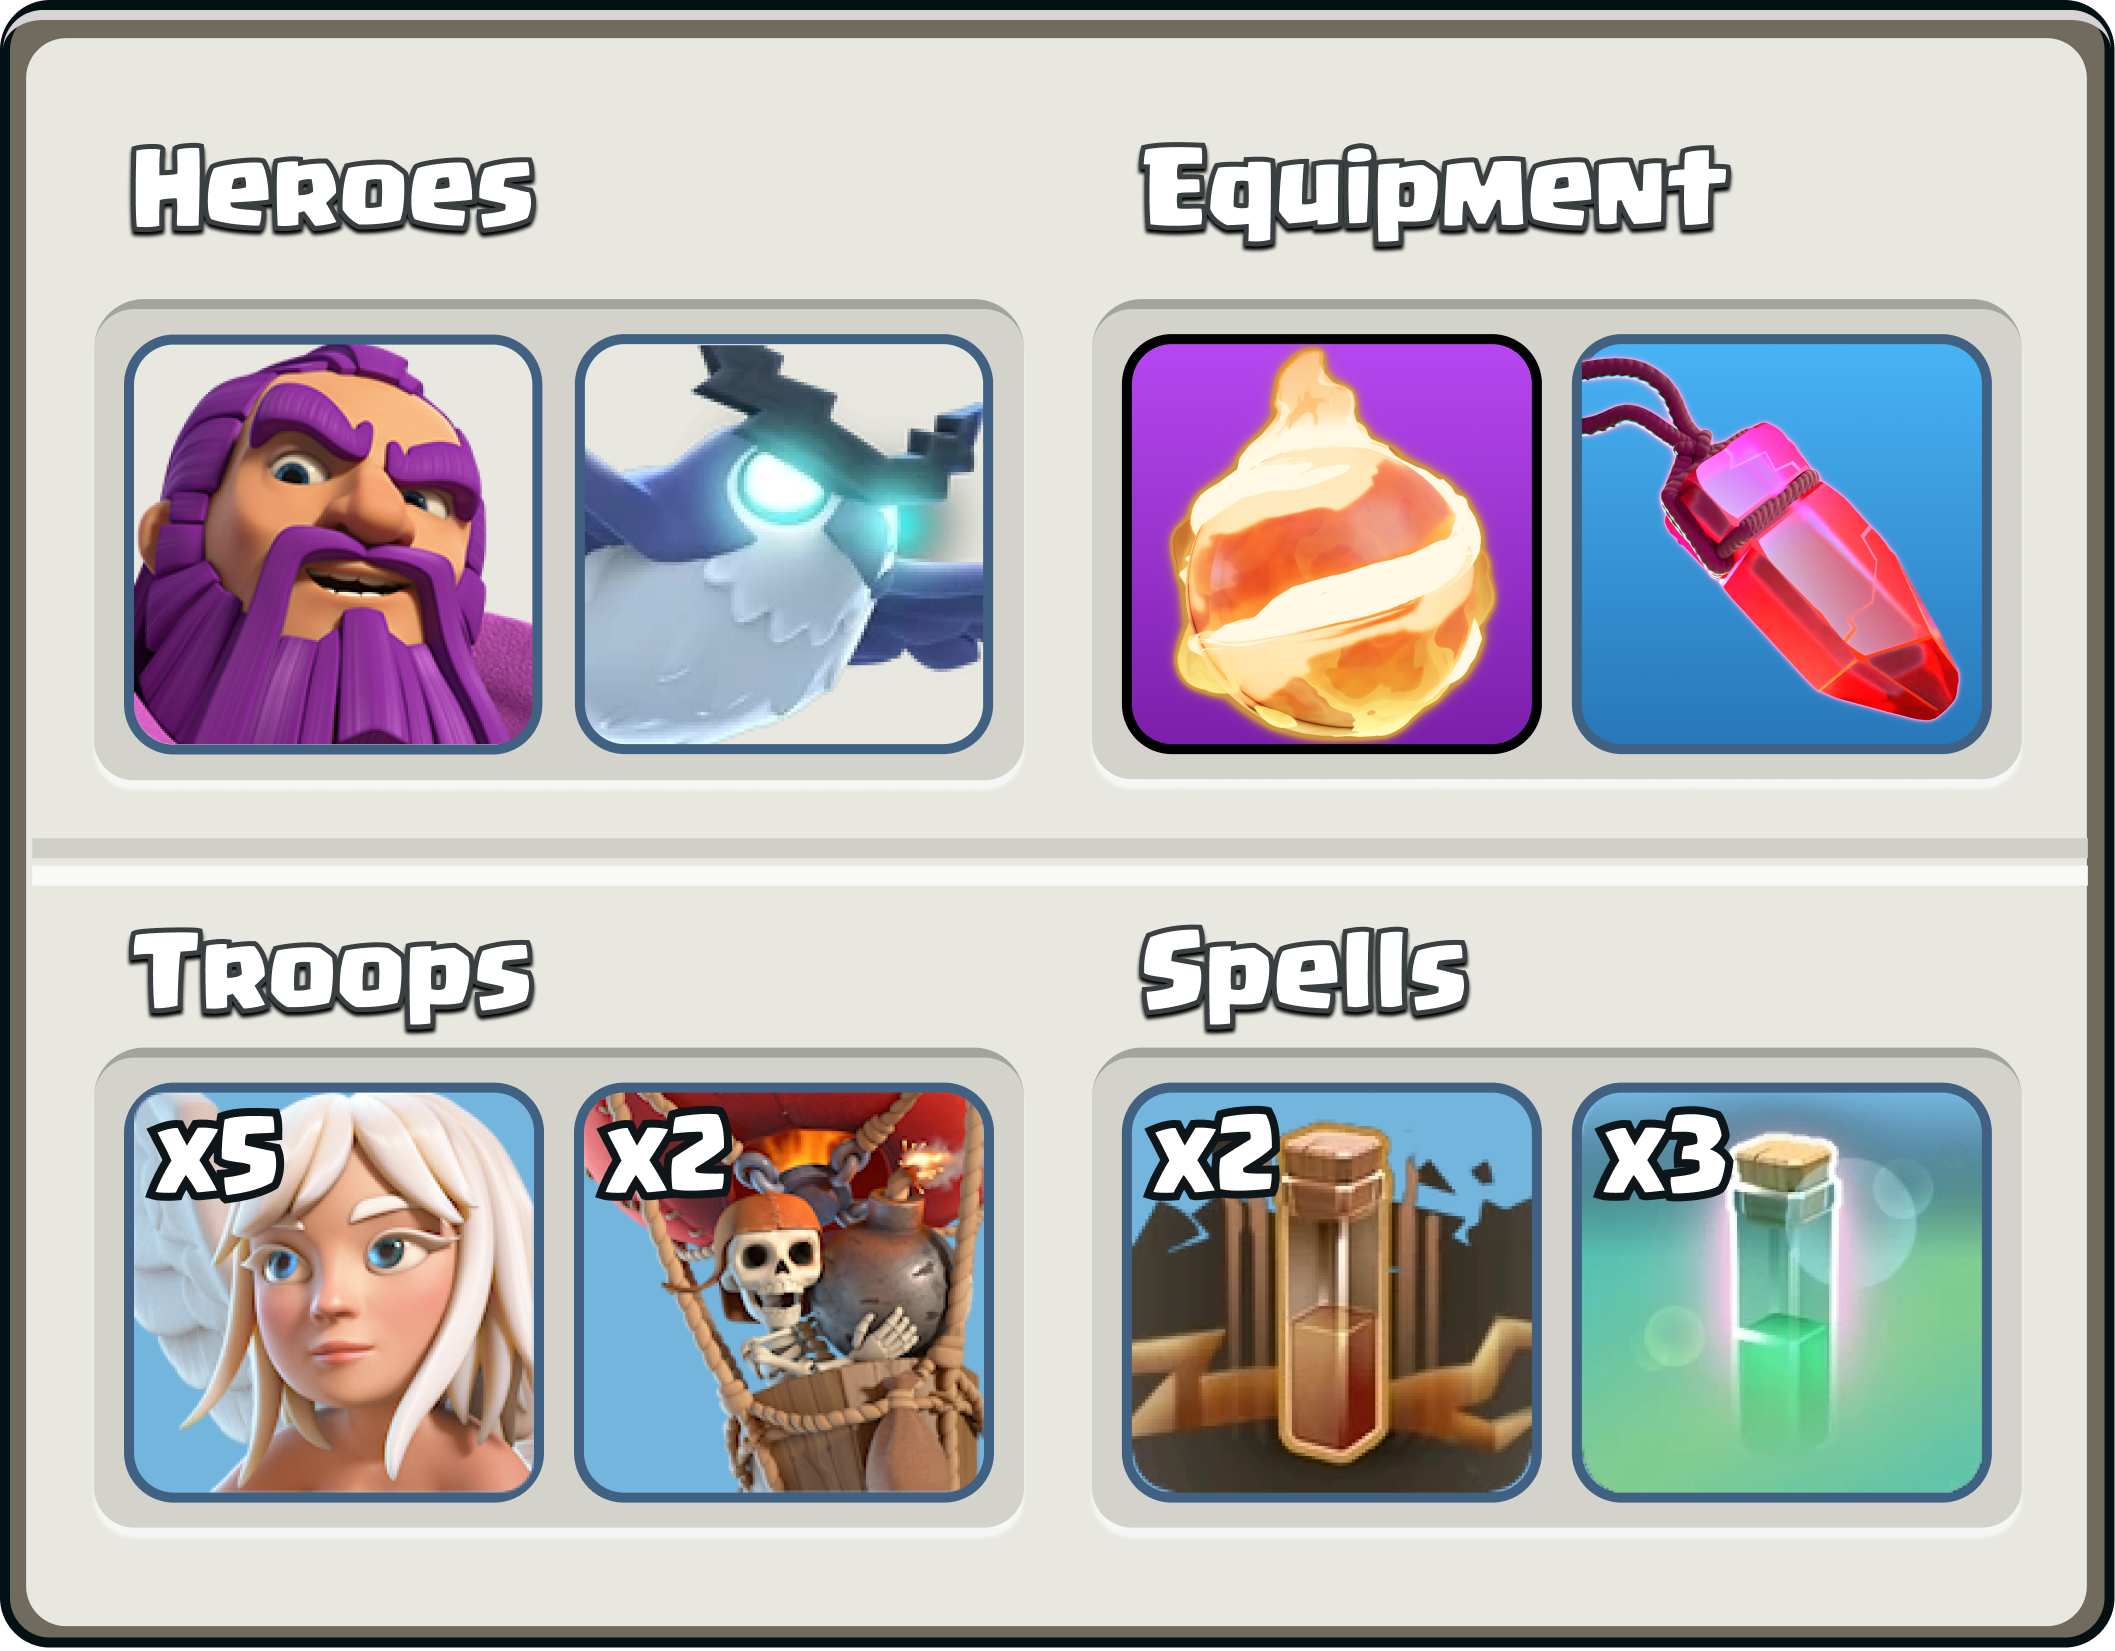
Fireball (Level 18+)
At Level 18, the blast radius increases from 5 to 6 tiles.
At Level 20, the fireball + 2 earthquake spells will destroy any building except the eagle artillery and town hall.
At Level 27, the fireball + 1 earthquake will do the same.
Rage Gem (Level 15+)
Increases the warden's damage and attack speed.
Buffs the rate of healing of the healers.
5 Healers
Used to keep your warden alive.
2 Balloons
Used to protect your healers by tanking red and black air mines.
3 Invisibility Spells
Used to redirect the fireball or protect your warden.
2 Earthquake Spells
Used to destroy buildings along with fireball.
Pet Choice on Warden
Most of the time, you can expect your pet to die early. Electro Owl has a great initial burst of damage and can tank seeking air mines. Frosty does less damage but has the added benefit of being safe from air defenses. Poison Lizard is clutch if you’re dropping him on top of an enemy hero.
Unicorn is like an additional healer. It’s great but usually better on the queen. You can use Phoenix if you’re so confident in your attack that the only you fail is if the warden dies.
I don’t recommend Angry Jelly unless you’re an experienced player. You can easily put your warden in danger way too quickly, and in this army we bring few spells to support him.
Phase 2: Queen Walk + Recall

Healer Puppet (Level 15+)
At level 15, the ability spawns 3 healers.
Frozen Arrow (Level 20+)
The slow effect allows her to duel enemy heroes, ricochet cannons, and multi-archer towers.
Giant Arrow (Level 18+)
Equip this if you’re going for town hall snipes.
A Level 18 giant arrow + Level 27 fireball + 3 earthquake spells will destroy the town hall.
A Level 18 giant arrow + 2 earthquake spells will destroy spell towers.
A Level 18 giant arrow + 1 earthquake spell will destroy a mortar.
Pet Choice on Queen
Use Unicorn with frozen arrow, and Frosty with giant arrow (it’s a budget frozen arrow).
1 Healer
Used to keep the queen alive.
1 Balloon
Used to tank for air mines.
1 Super Wall Breaker
Used to grant the queen access to defenses inside a compartment or a second layer.
1 Recall
Used to scoop up the queen after she has gotten her value.
Used to scoop up healers if one of your heroes dies early.
Phase 3: King + Ground Smash
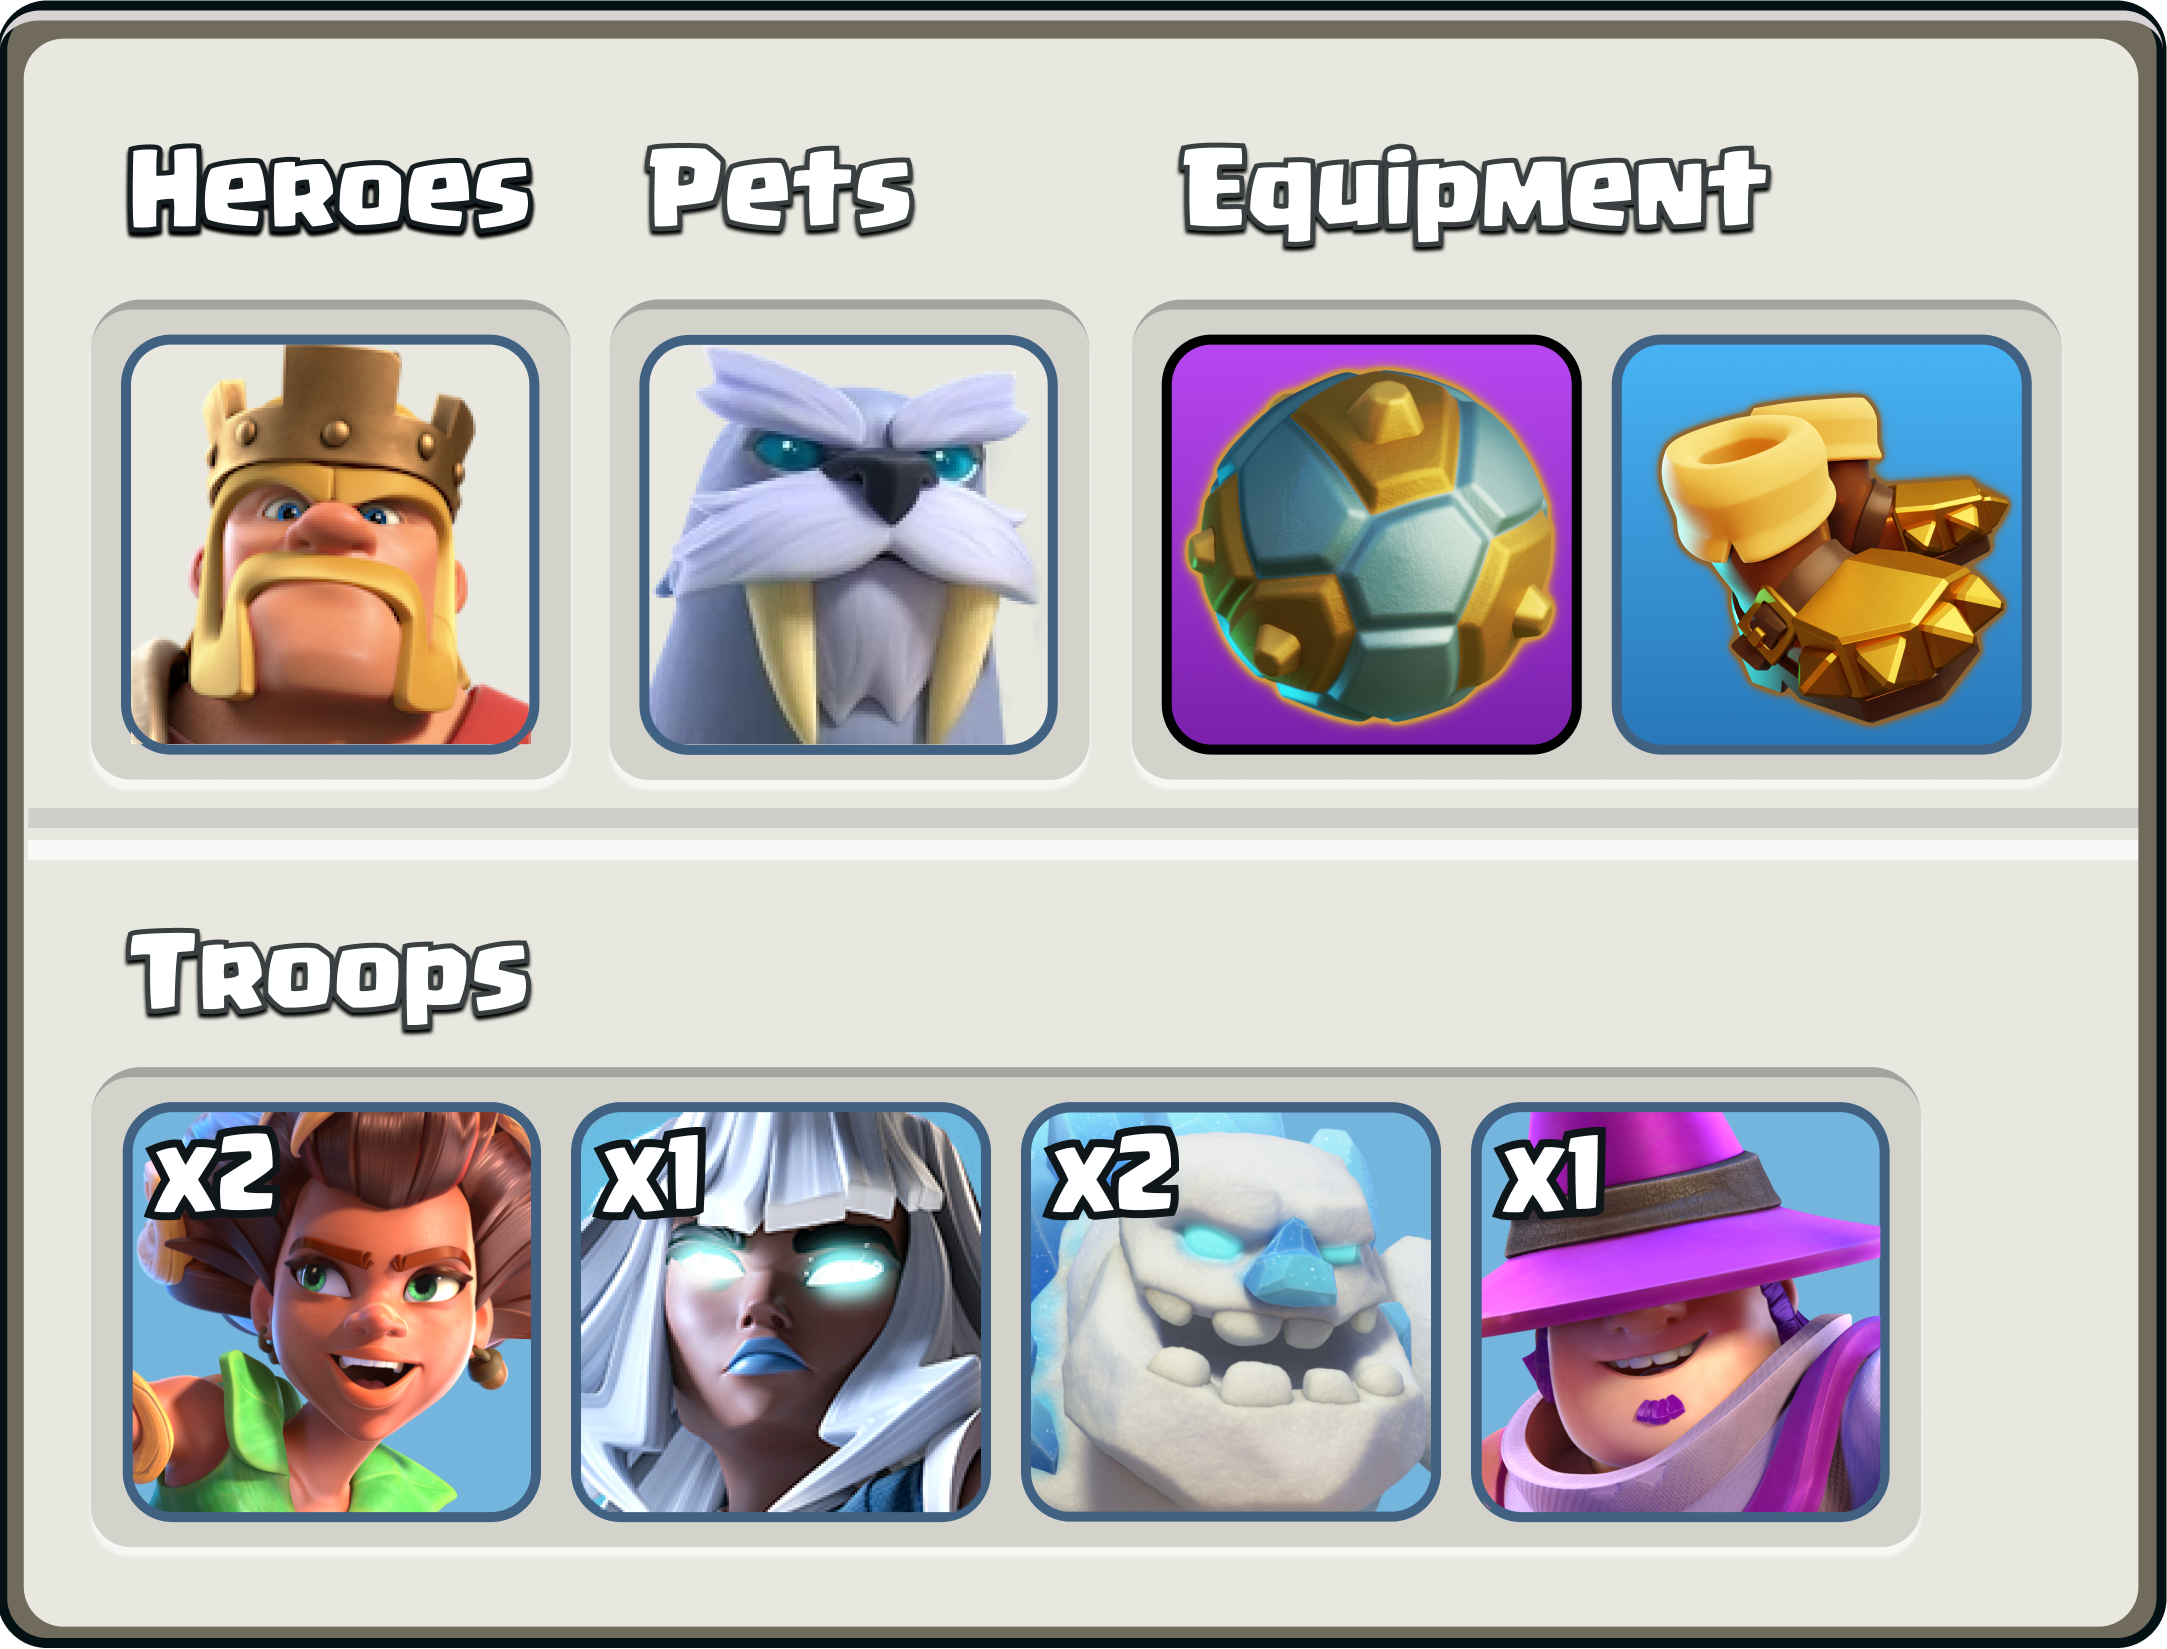
Spiky Ball (Level 18+)
At Level 18, the number of targets increases from 6 to 7.
Used to prevent time-failing by cleaning up buildings near the end.
Earthquake Boots (Level 9+)
Used to open up walls and deal massive damage to surrounding structures.
Pet Choice on King
Use Frosty, Diggy, Yak, or Poison Lizard with EQ boots + Spiky Ball. Frosty slows defenses on the other side of walls. Yak can break open those walls and act as an extra tank. Diggy can stun defenses, and Poison Lizard can deals with enemy heroes and clan castle troops.
Use Phoenix or Angry Jelly with giant gauntlet + rage vial. Phoenix shines if you're sending him into heavy fire (eg. a monolith) and expect him to die early. Angry Jelly is niche but can be super strong if you have a clear idea of where you want him to go, and want to save funneling troops.
2 Root Riders
Used for tanking and wall-breaking for your king, ice golems, and electro titan.
1 Electro Titan
Used as an all-rounder in terms of tankiness and damage.
Used to evaporate ground skellies or enemy clan castle troops.
2 Ice Golems
Used for tanking. It's like bringing extra freeze spells.
1 Apprentice Warden
Used to keep your troops alive for longer.
Royal Champion

Rocket Spear (Level 18+)
At level 18, the number of spear shots increases from 8 to 9.
Seeking Shield (Level 15+)
Pairs well with the rocket spear.
Haste Vial (Level 12+)
Hog Rider Puppet (Level 15+)
1 Earthquake Spell
Used to soften up defenses for the shield + spear.
Pet Choice on Royal Champion
Use Spirit Fox or Diggy with the rocket spear + seeking shield combination. Phoenix can also work if you intend for her to die.
Use Spirit Fox with the haste vial + hog puppet setup.
Accessory Troops

5 Super Barbarians
Used for funneling, cleanup, and extra support.
4 Valkyries
Used for extra damage and funneling.
1 Baby Dragon
Used for funneling.
1 Headhunter
Used to kill enemy heroes, often to speed up the takedown of the enemy king.
Together with super barbarians or an ice golem, can snipe an enemy hero on the edge of the map.
2 Minions
Used for sniping buildings and funneling.
5 Archers
Used for checking for tesla fireball baits.
Used for sniping buildings and funneling. During the warden walk, you’ll often have downtime. Use this time to find buildings to snipe. 1 building for 1 housing space is a good bargain!
Used to speed up your warden-walk (for example, if he’s stuck on two hoards of ground skeletons).
1 Barbarian
Used to check for teslas or ground skeletons for your warden walk or flame flinger.
1 Overgrowth
Used as a really long freeze or as a funneling tool.
1 Poison
Used to kill enemy clan castle troops.
1 Rage
Used to support your army as necessary.
1 Freeze
Used to support your army as necessary.
Siege Machines


S Tier - Flame Flinger

Flame Flinger is the best bang-for-your-buck siege machine. Always use it if the base offers gives it up. Unfortunately, as you climb higher in the ranks, bases are built to defend against flame flingers, so you’re more likely to be using other options.
Tips:
Watch out for mortars, ground xbows, enemy heroes, and the monolith. They outrange the flame flinger.
Check for teslas and ground skeleton traps by deploying a test barbarian, archer, or a balloon. If traps do pop up, take care of it with supporting troops or deploy your flame flinger elsewhere.
Avoid placing your flame flinger behind your troops, in the path of where the buildings would’ve been taken out anyway. This one seems obvious, but I see it way too often. You’re basically nullifying the value of the siege machine.
Don’t drop your flinger too late. It’s a slow siege that takes time to work. 1m50s remaining is the latest time you want to drop it.
Spells don’t work on siege machines. If enemy clan castle troops are barreling down at your flame flinger, then dropping an invisibility spell on your flinger won’t shoo them away.
🦇 Best clan castle troops w/ Flame Flinger - Choose troops that can clean up / continue the work after your flame flinger expires.
4x Super Minion, 1x Minion
6x Rocket Loon, 1x Minion
A Tier - Siege Barracks, Battle Drill
The Siege Barracks is awesome. Two P.E.K.K.As + wizards can clear out an entire corner and act as a great funnel. You can also drop it behind your smash for the extra juice.
🦇 Best clan castle troops w/ Siege Barracks - Choose troops that can clean up / quickly join your army after your siege barracks expires.
4x Super Hog Rider, 2x Archer
4x Super Minion, 1x Minion
The Battle Drill is like a super wall breaker that stuns. It’s really good at getting your smash through the base. It can also be sent alone or with your royal champion.
🦇 Best clan castle troops w/ Battle Drill - Choose troops that can tank / destroy defenses after your battle drill pops.
1x Dragon Rider, 1x Rocket Loon, 3x Balloon, 1x Minion
2x Yeti, 1x Rocket Loon, 1x Loon, 1x Barbarian
2x Root Rider, 1x Valkyrie, 2x Barbarian
B Tier - Log Launcher, Stone Slammer
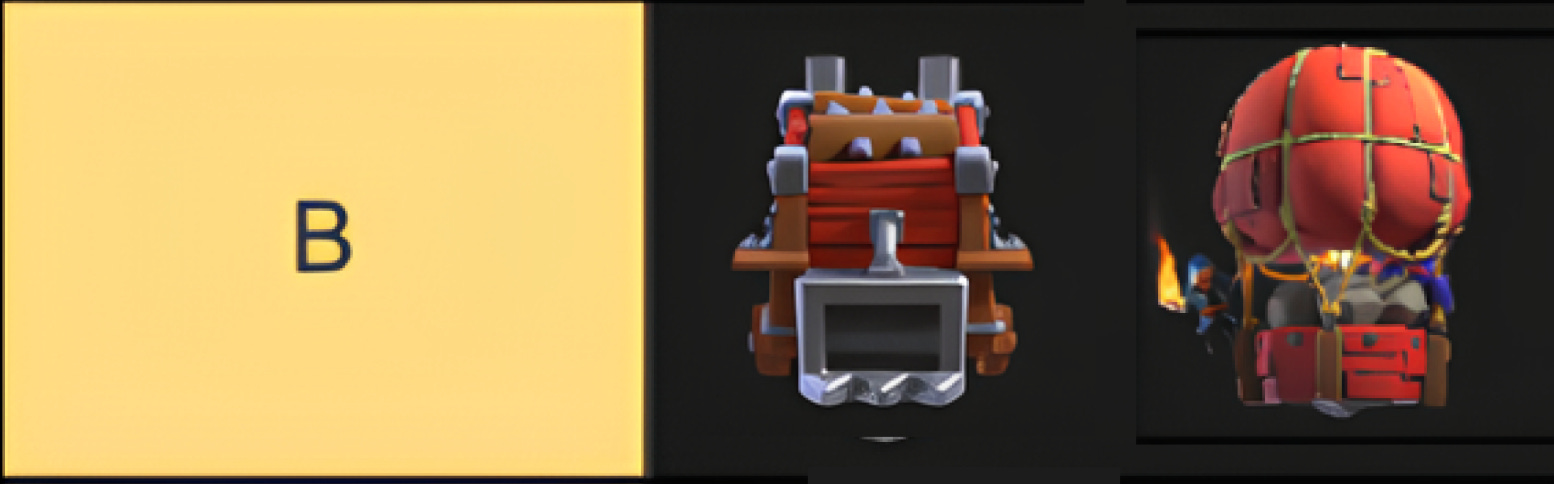
Use the log launcher to pre-trigger invisibility spell towers before your army arrives. Keep in mind the invisibility tower has the fastest recharge time out of all the spell towers (= 50 seconds), so don’t log too early.
The log launcher is also great at opening up walls for your smash. Useful against bases with multiple layers of walls in the straight line path of your log launcher.
🦇 Best clan castle troops w/ Log Launcher - Choose troops that can bolster your smash after your log launcher expires.
1x Root Rider, 1x Druid, 1x Healer
2x Root Rider, 1x Valkyrie, 2x Barbarian
The Stone Slammer doesn’t synergize as well with our army as it’s an air unit in a primarily ground-based attack. But it’s still a strong siege, and if you’re sending it into an area that’s light on air defenses, then it can be a fantastic option. It operates like a battle drill by destroying walls and defenses and is stronger on its own.
🦇 Best clan castle troops w/ Stone Slammer - Choose troops that can continue the work after your stone slammer pops.
1x Super Dragon, 2x Balloon
1x Electro Dragon, 4x Balloon
1x Dragon Rider, 1x Rocket Loon, 3x Balloon, 1x Minion
C Tier - Battle Blimp

The Battle Blimp doesn’t synergize well with our army, We don’t bring lava hounds, barely any loons, and no eternal tome, so it’s hard to protect the blimp and get it to land in a good place. That being said, you can still use it in certain situations.
We only bring 1 rage in our army (which is why I’m against the blimp), but if we had another rage, and want to dedicate a rage to our blimp, then a yeti bomb can be a great option.
🦇 Best clan castle troops w/ Battle Blimp - Choose troops that can destroy buildings at the spot where your battle blimp pops.
2x Yeti, 1x Rocket Loon, 1x Loon, 1x Barbarian
1x Super Dragon, 2x Balloon
D Tier - Wall Wrecker
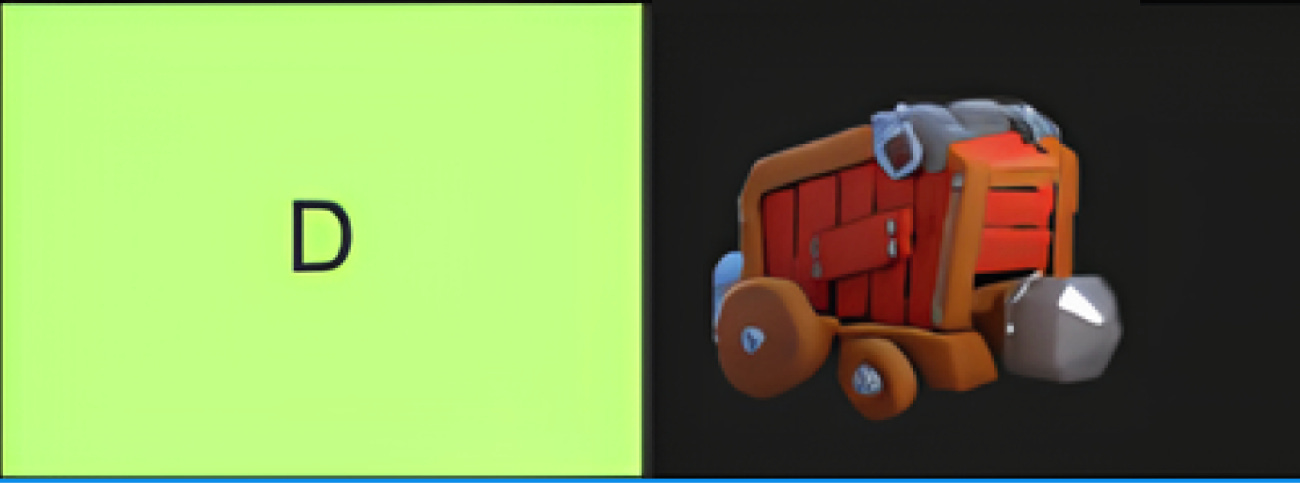
Where you’d want a Wall Wrecker, you’re probably better off with a Log Launcher. It does the same thing but is more powerful.
The only scenario I can think of where I’d prefer a Wall Wrecker is when the town hall is on the edge of the map surrounded by light / minimal defenses and a single layer of wall. Let’s say you want to yeti-bomb the town hall, but there’s a slight chance two seeking air mines might strike it down, then a Wall Wrecker may be a more reliable way of delivering yetis to the town hall without the need to expend coco-loons.
🦇 Best clan castle troops w/ Wall Wrecker - Choose troops that can destroy defenses after your battle blimp pops.
2x Yeti, 1x Rocket Loon, 1x Loon, 1x Barbarian
I know. That was a LOT. The beautiful thing about Quad Heroes is in its versatility. Don’t be afraid of all the options; be thankful you have them 😂. And feel free modify the composition according to your preferences and troop levels. For example, if you don’t want to spend dark elixir, then swap super barbarians for baby dragons and super wall breakers for normal wall breakers. If you love rocket loons, then sub a few of those in. The only real non-negotiables are the fireball + rage gem and healer puppet.
For clan war / CWL / esports hits, where you have time to plan, feel free to tailor the army to the base. You might substitute the number of earthquake spells, the number of wall breakers, choice of siege machine, whether you bring a poison, queen’s equipment, royal champion’s equipment, pet choice (eg. Jelly) on the king, etc. And tinker with funneling troops to ensure you have a good setup.
For legend league, my army composition is always changing, based on the meta, event troops, and optimizations I make over time. For example, V1 had 11 super barbarians, whereas V3 has 5. The major difference is for legend league, you need a composition that will work against any base, but it may not be optimal for any particular one. My standard composition has been working well for me. I will share it below.
Here’s a detailed walkthrough of how to execute the strategy.
If you’re an average player, I recommend reading the text in full and reviewing the annotated base breakdowns.
If you’re an above average player, I recommend reading the text in full.
If you’re a pro player, I recommend watching my Legend League videos. Reading the text is optional and you can do so for fun.
I recommend everyone watch at least 1 video before proceeding. It’ll help ground the explanations.
Video 1: Frozen Arrow Variation
Video 2: Giant Arrow Variation
More on my YouTube Channel.
Let’s Begin:
Scouting Phase
Look for these four things in this order:
Where to fireball
Choose siege machine
Where to queen walk
Where to send in your smash
Note: If you’re in legends league, with ~30 seconds to scout, then focus on the first two. The rest can be decided later on.
1. Where to fireball?
Areas packed with core defenses are best.
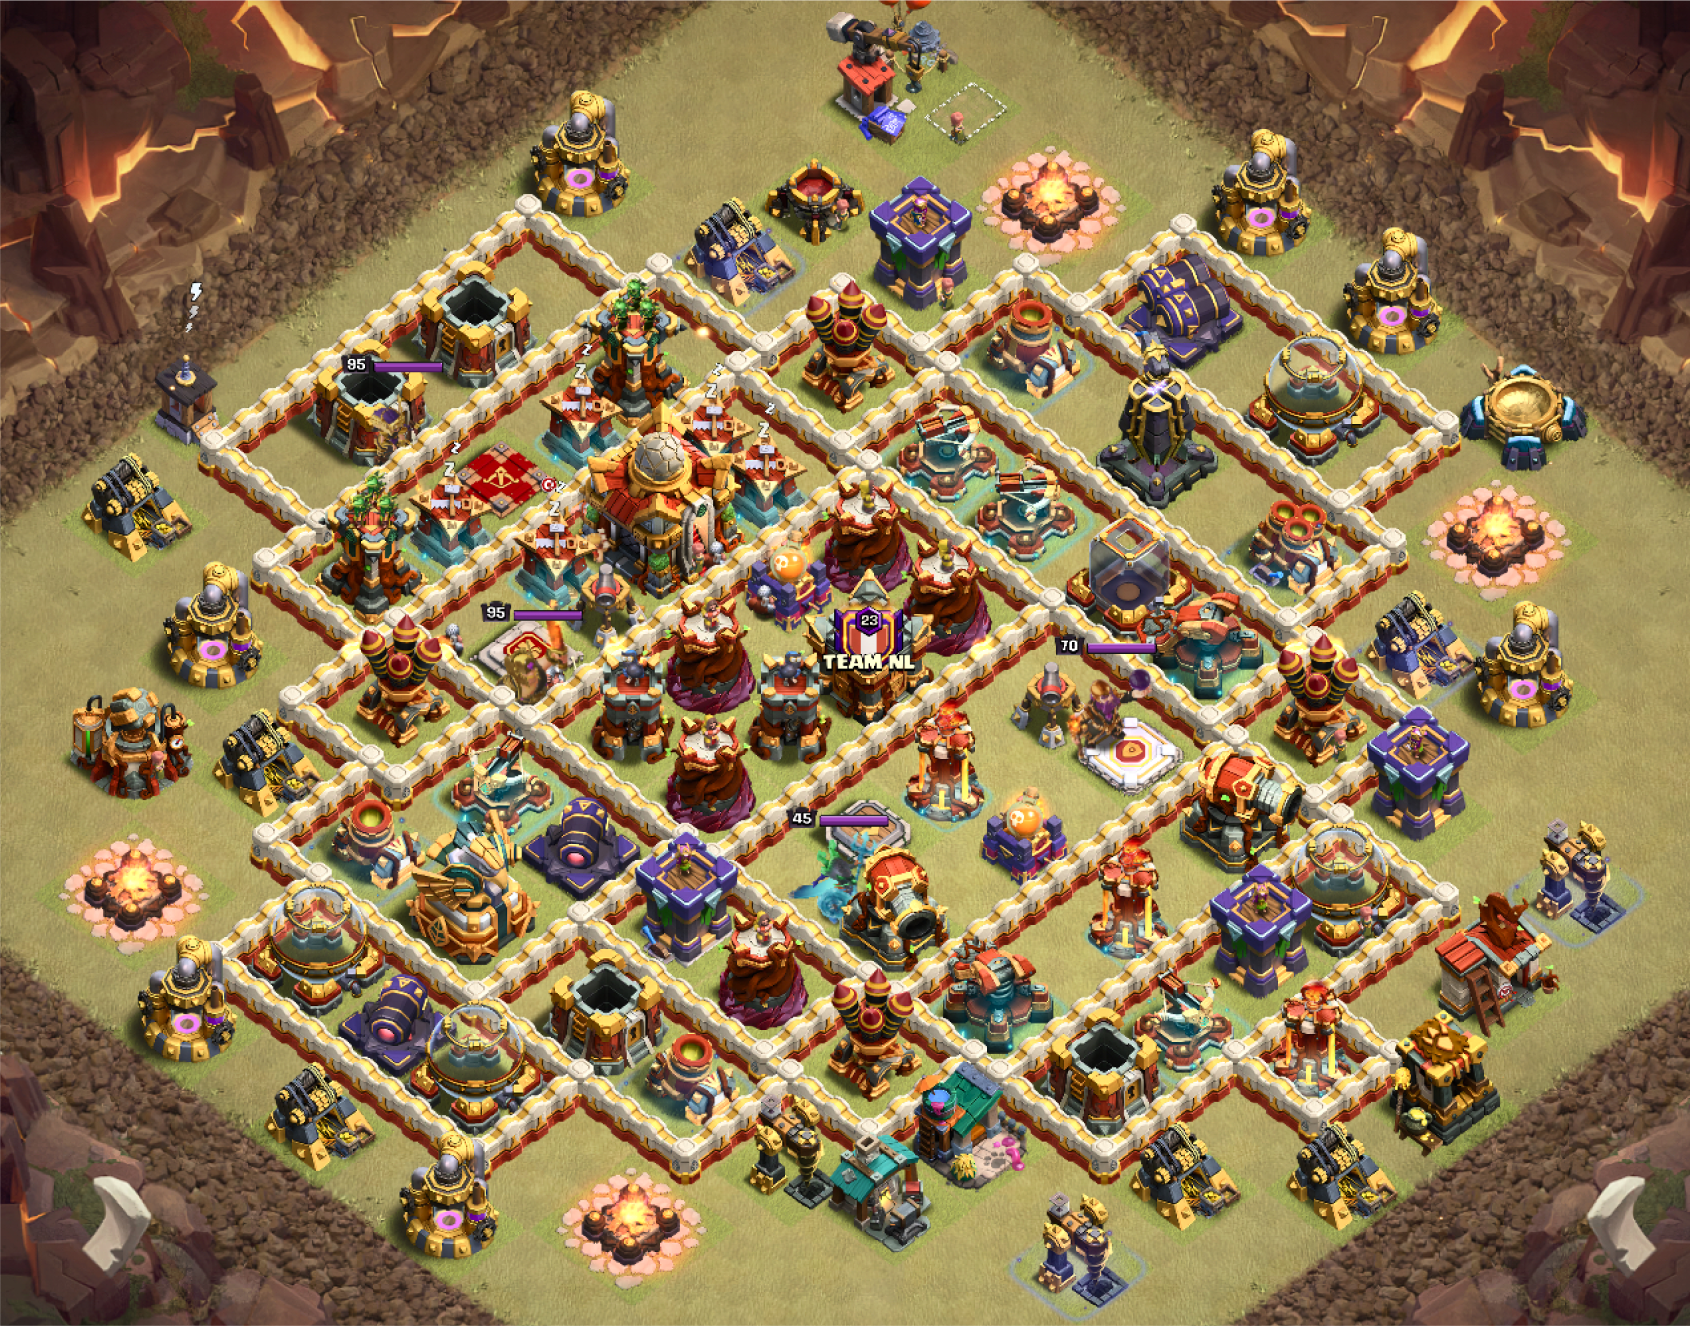
Look at this base:

Notice the top-right and bottom-left compartments. They are stacked with defenses. Fireballing here is best.

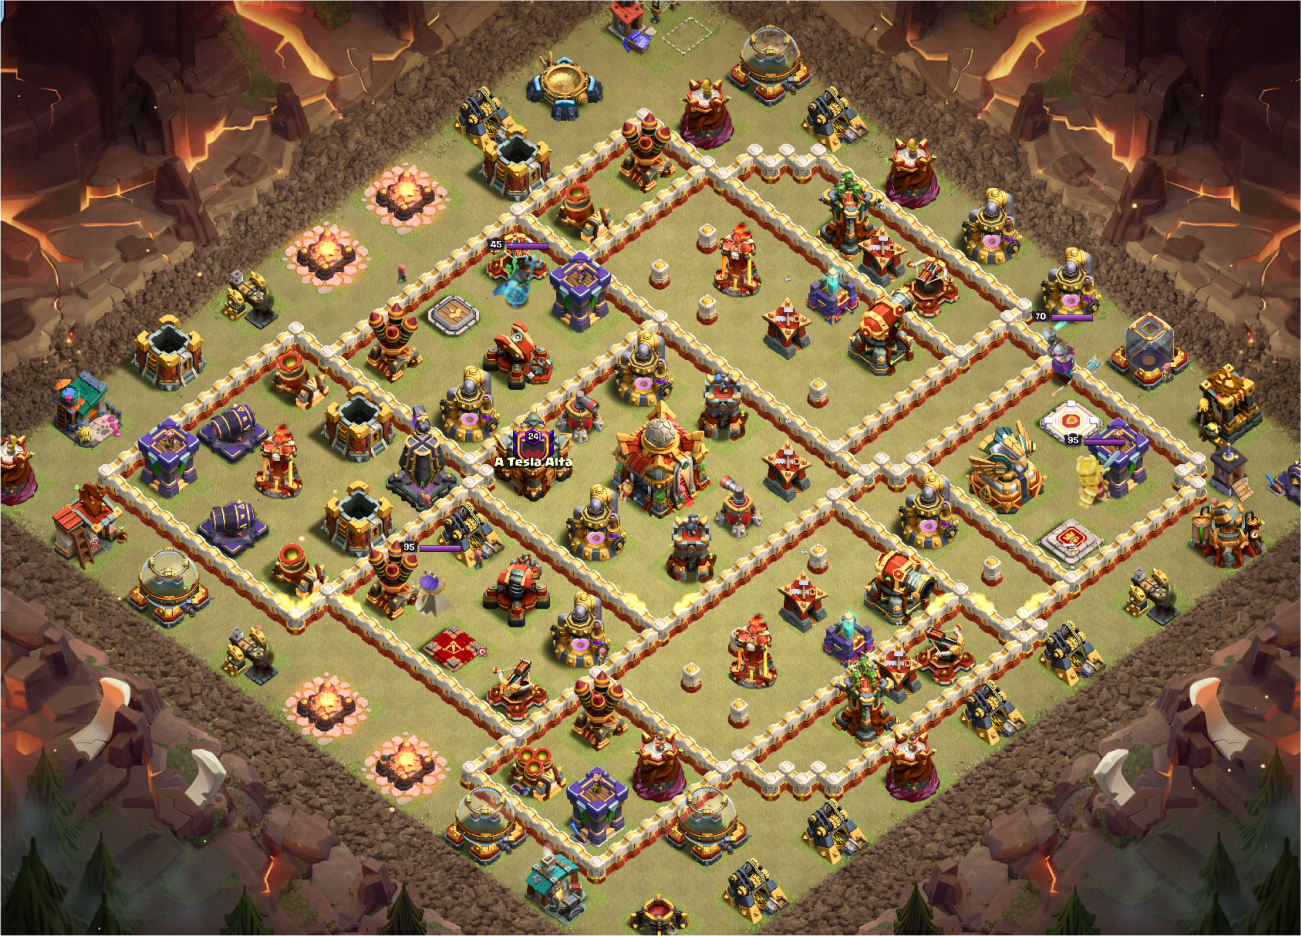
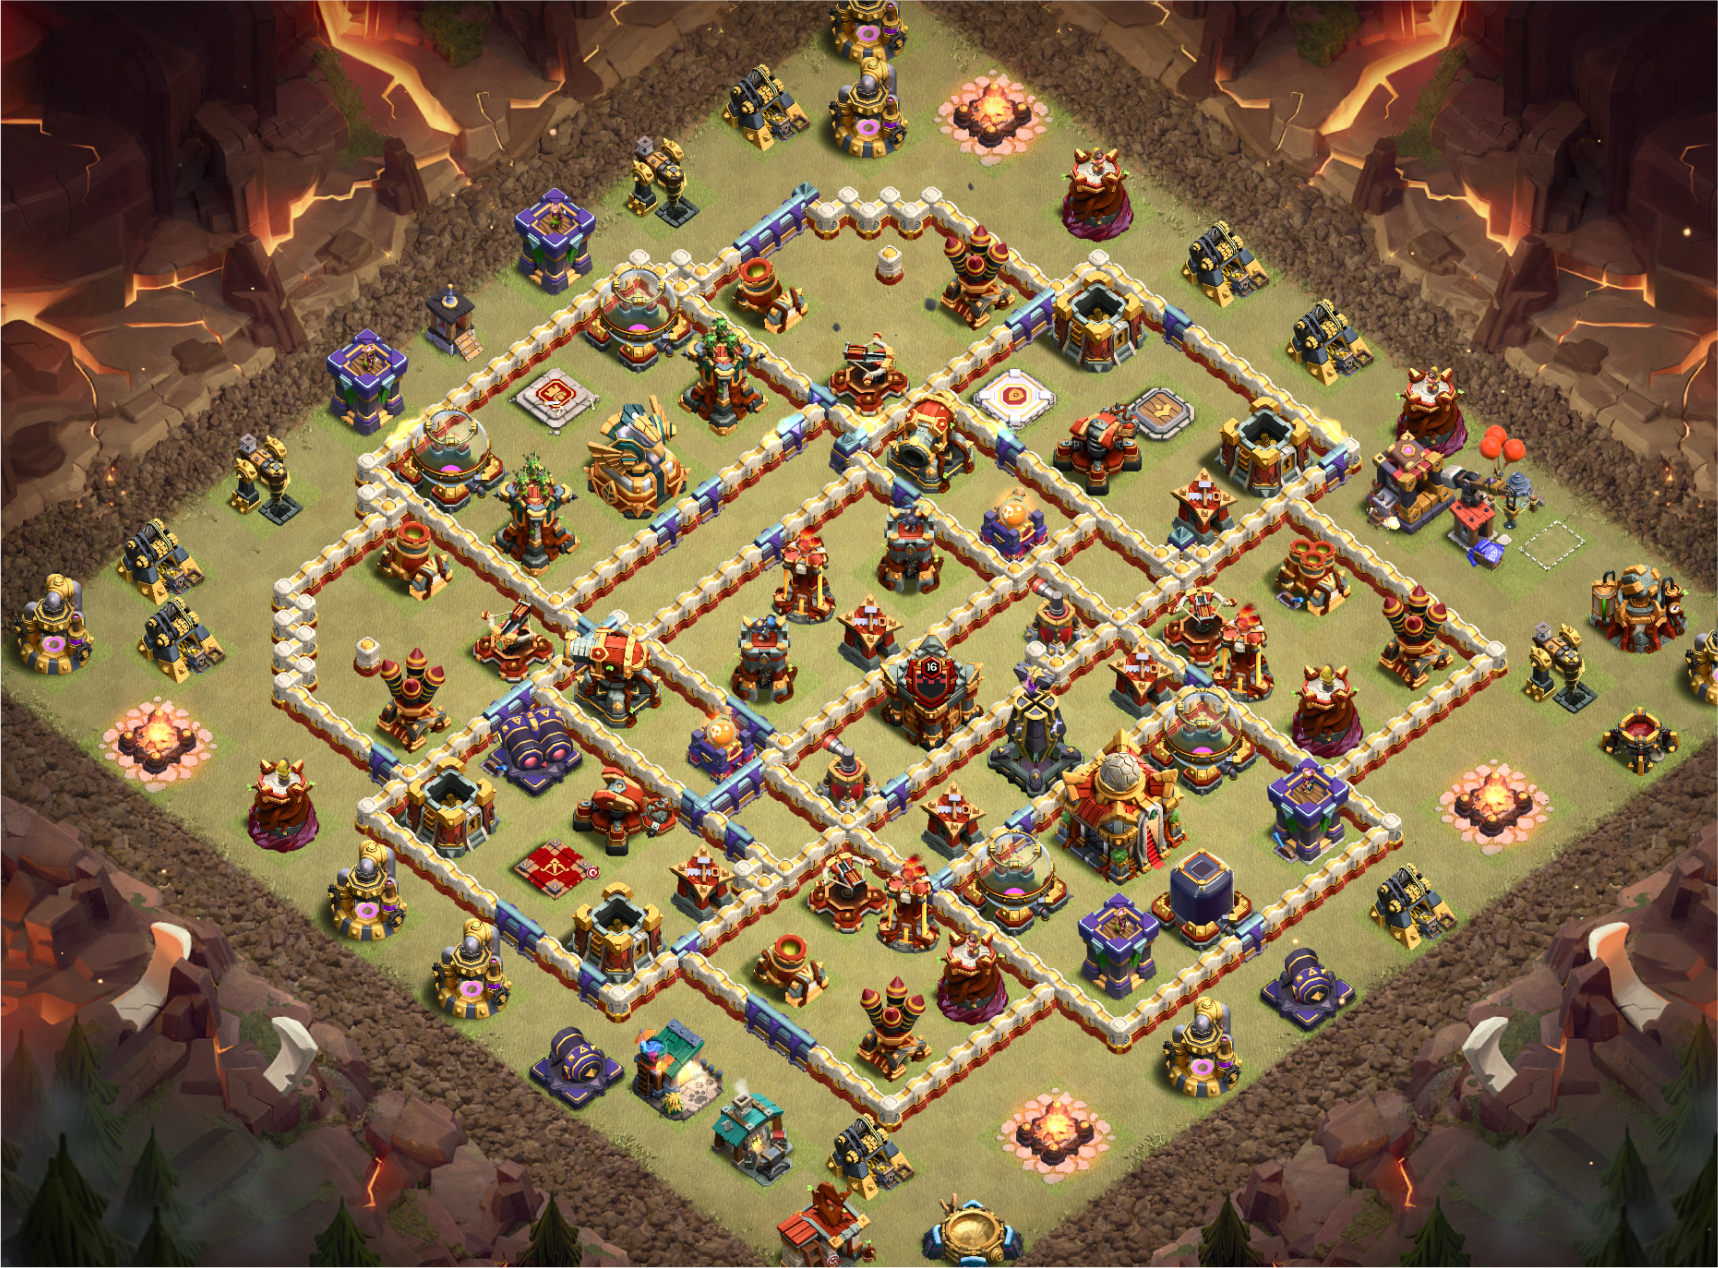
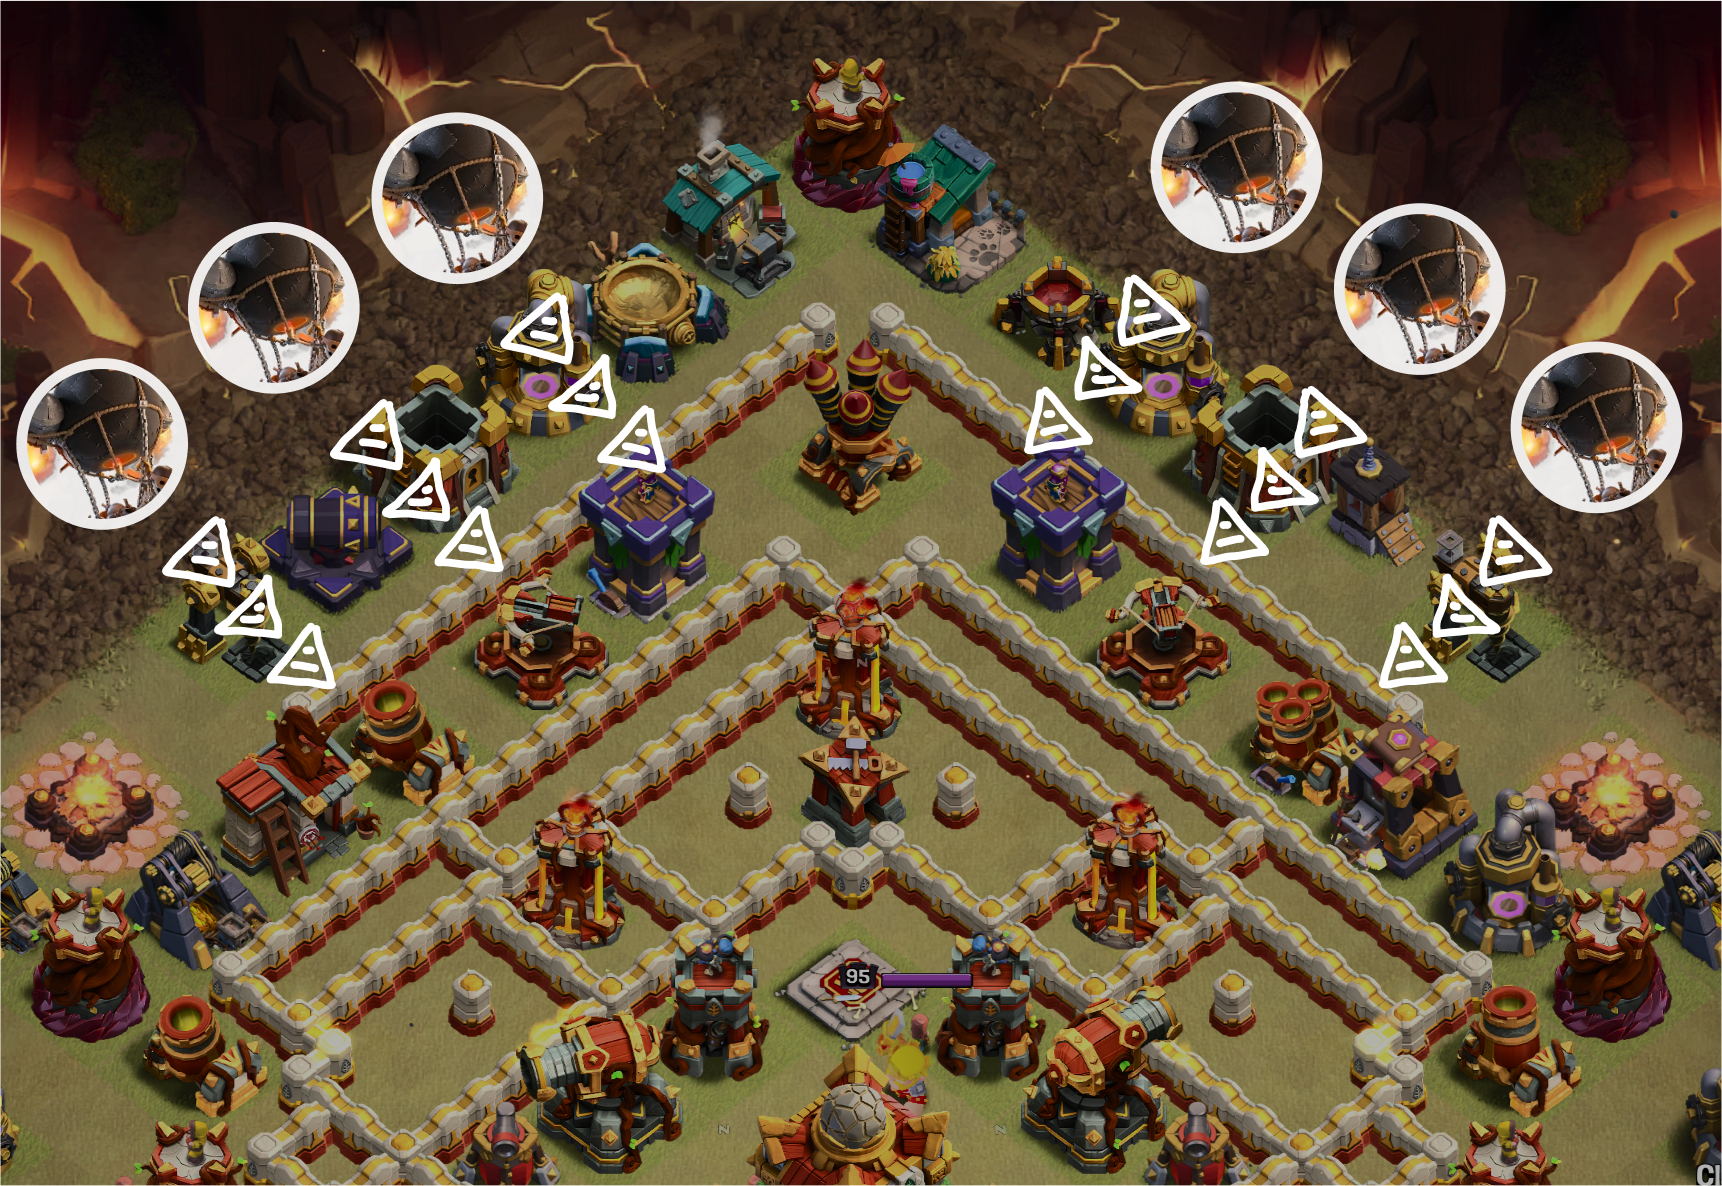
Ok.. What about this base?
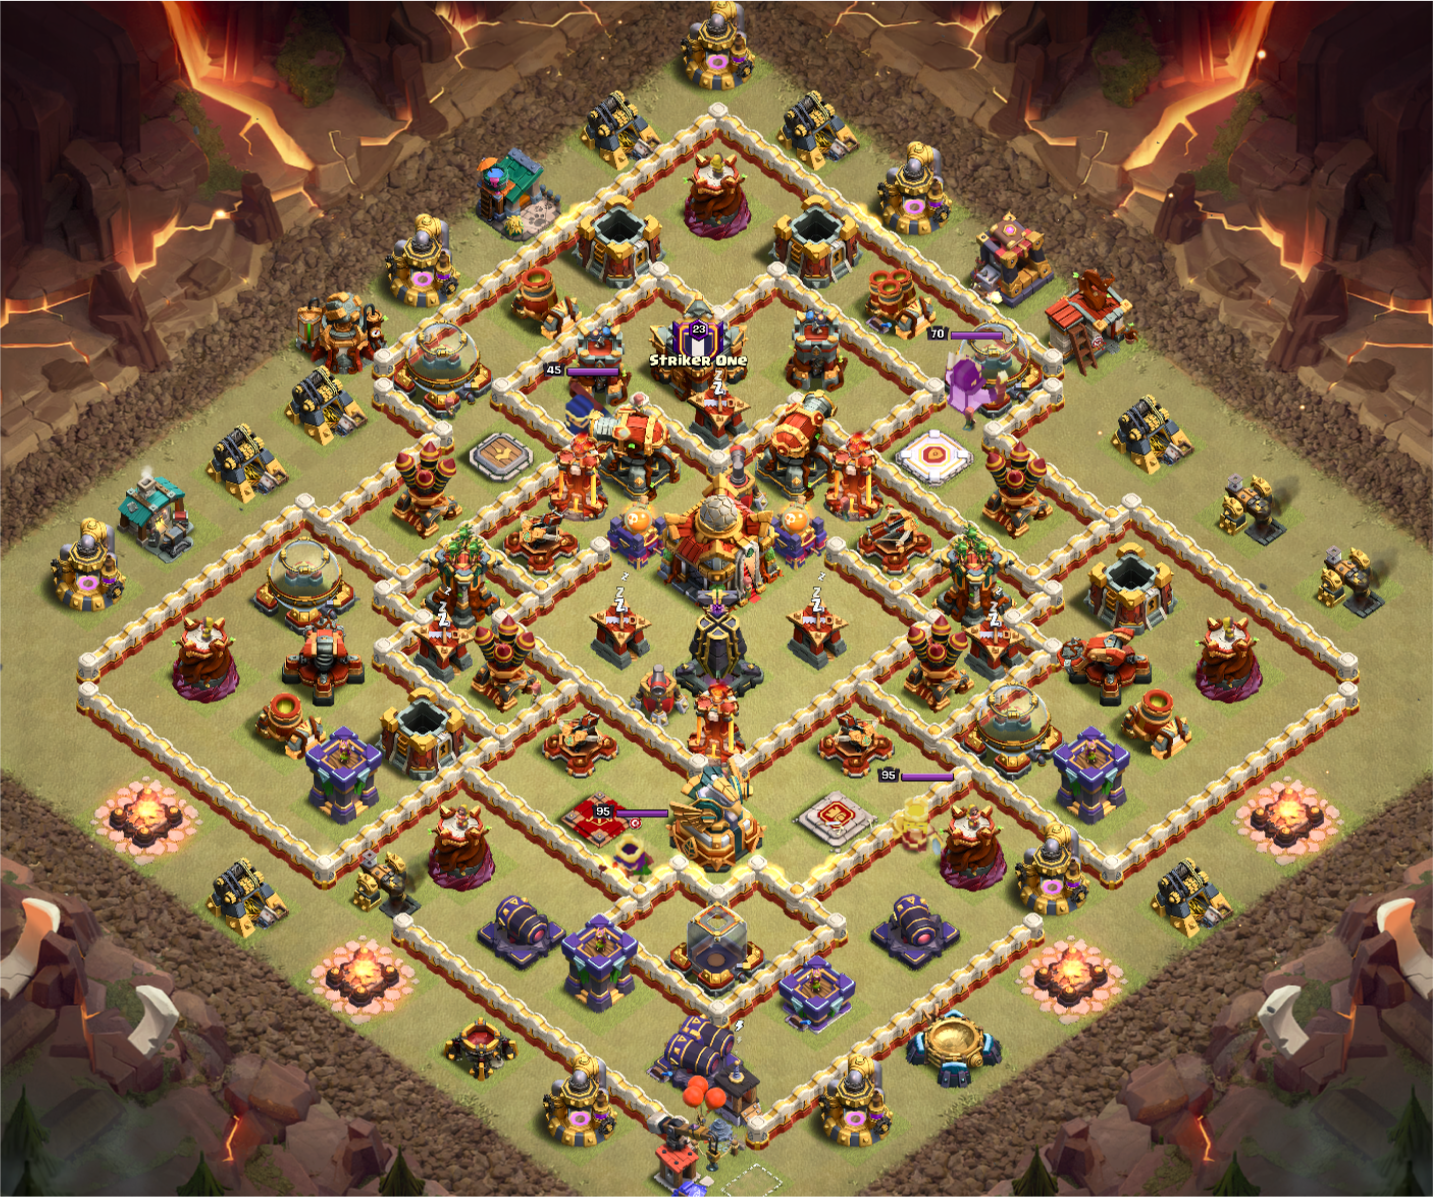
Not as obvious as the first one, but if we look closely, we see a cluster of buildings on the north side. By fireballing the top builder hut, we can blast 2 ricochet cannons, 2 multi-infernos, 2 poison towers, and damage the town hall.

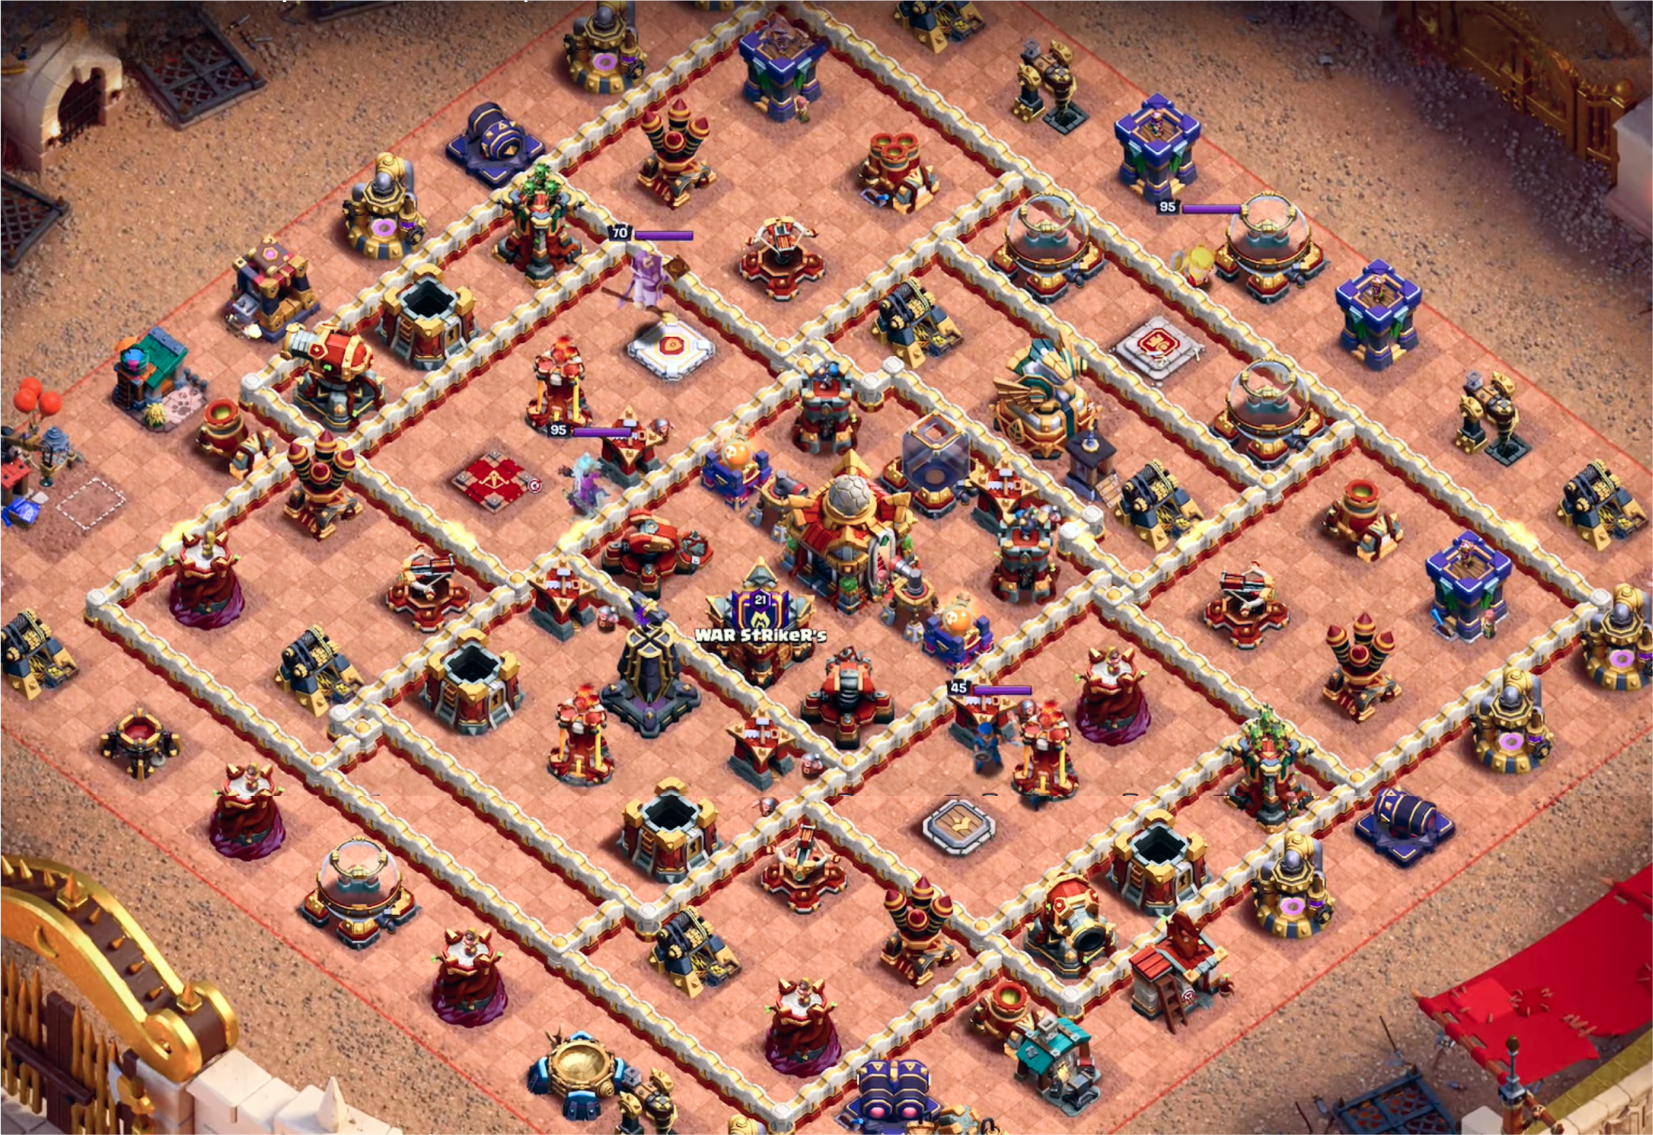
Last one:

A bit tricky, eh?
The base is pretty spread out. It’s hard to fireball more than 2-3 major defenses at once. Here are some options:

They are all viable, but you also have to consider the ease of landing it there. If you have to invest too many spells (for protecting the warden or redirecting the fireball), then it may be better to go for a safer, but less “valuable” target.
Generally, these are the best buildings to fireball:

S tier: Enemy Clan Castle
A Tier: Monolith
B Tier: Town Hall / Eagle Artillery / Ricochet Cannon / Single Inferno
C Tier: Scattershot / Multi-Archer / Xbow / Rage Tower
D Tier: Enemy Queen / Enemy RC / Multi-Inferno
We accompany the fireball with an extended warden walk.
The grand warden is one of the most powerful units in the game. With a 7-tile attack range, ~500 DPS at max level, and supportive healing, he can clear up to 50% of the base alone. An extended warden walk also gives us more fireball options, thereby we can avoid some of the common fireball baits that rely on the attacker fireballing instantly.

To start the warden walk, drop him on ground-mode followed by 5 healers. 9 out of 10 times, you want to use 5 healers, unless he is walking into virtually no damage for a long time. You may also want to drop a coco-loon* or two.
“Coco-loon” refers to a balloon that floats ahead of your healers to check for air mines. The balloon is intended to die and fall out of the sky like a coco-nut falling out of a tree.
The warden walk is similar to a queen walk; but not necessarily easier to execute. Here are some key differences you should know:
The warden has a longer range than the queen (5 vs 7 tiles) and he can hop over walls. Therefore his pathing is more predictable, he’s safer since he can stay out of range of defenses, and he doesn’t need as many funneling troops.
The warden deals less damage than the queen, so a warden walk takes longer than a queen walk. The rage gem is a must— it gives him +22% attack speed at max level.
The warden has fewer hitpoints than the queen. He can die very easily if you're not paying attention. One barrage of eagle artillery fire deals 65% of the warden's health. The enemy archer queen can solo-kill him.
The warden does not have a second life, unlike the queen who typically has the invisibility vial or magic mirror.
The warden outranges the enemy barbarian king and royal champion (most of the time), and the enemy queen (some of the time), depending on where the enemy heroes are relative to their altars.
The warden is counterintuitively strong. He can solo-kill a monolith or town hall (the 2 largest defenses) (assuming no other defenses nearby), but put him in range of a multi-archer tower + xbow, and he'll need spell support.
The warden follows large troops, so be careful when placing troops nearby, unless you intend for him to follow. A baby dragon is fine. Super barbarians at a distance is fine. But too close and the healers might transfer over. Minions, archers, and barbarians are fine. Even a yeti is fine, but it’s gimmicky, as sometimes he won’t follow when his pet has died. He will follow root riders, heroes, and other large troops. And the follow detection range just is a few tiles outside of his circle.
Here are some warden-walk tips specific to this army:
Warden-walk for as long as possible. Generally, you don’t want to merge him into your army. Instead, extract maximum value from him as an independent battle machine.
Wait and see where he goes before placing other troops. To ensure the warden stays independent, first see where he’ll likely path towards, so we can path the rest of our troops away from him. This means delaying the deployment of our other troops.
Let the warden handle enemy clan castle troops. Generally, the warden can take out enemy clan castle troops by himself, especially if there are ice golems inside. Super minions, rocket loons, and/or headhunters are probably the most dangerous combination. You’ll have to be fast on your reaction times, investing a poison and even a rage / invis.
Maybe don’t charge the core. Often, you’ll be overgrowthing the core, so you don’t need him to go there. Since you’re only bringing 1 rage and 3 invis, it’s hard to keep him alive if you charge in too deep.
Know your fireball damage. This sounds obvious, but there are a couple of nuances. For example, while a level 20 fireball + 2 earthquakes technically destroys a clan castle— a single builder hut repair tick will save it. Therefore you may need to adjust the placement of your earthquake spells depending on the target.
🔥 When to fireball?
Sometimes you do it instantly, other times you save it until the final 10 seconds of the attack. Generally, I’ve found 30-60s to be a good benchmark, as it’s usually after you’ve cleared out a few defenses and can line up the fireball properly.
💡 Tip: Use invisibility spells to hide defenses to aim your fireball properly. They last for ~4 seconds and have a fairly large radius, as they can cover defenses as far as 3 tiles apart.
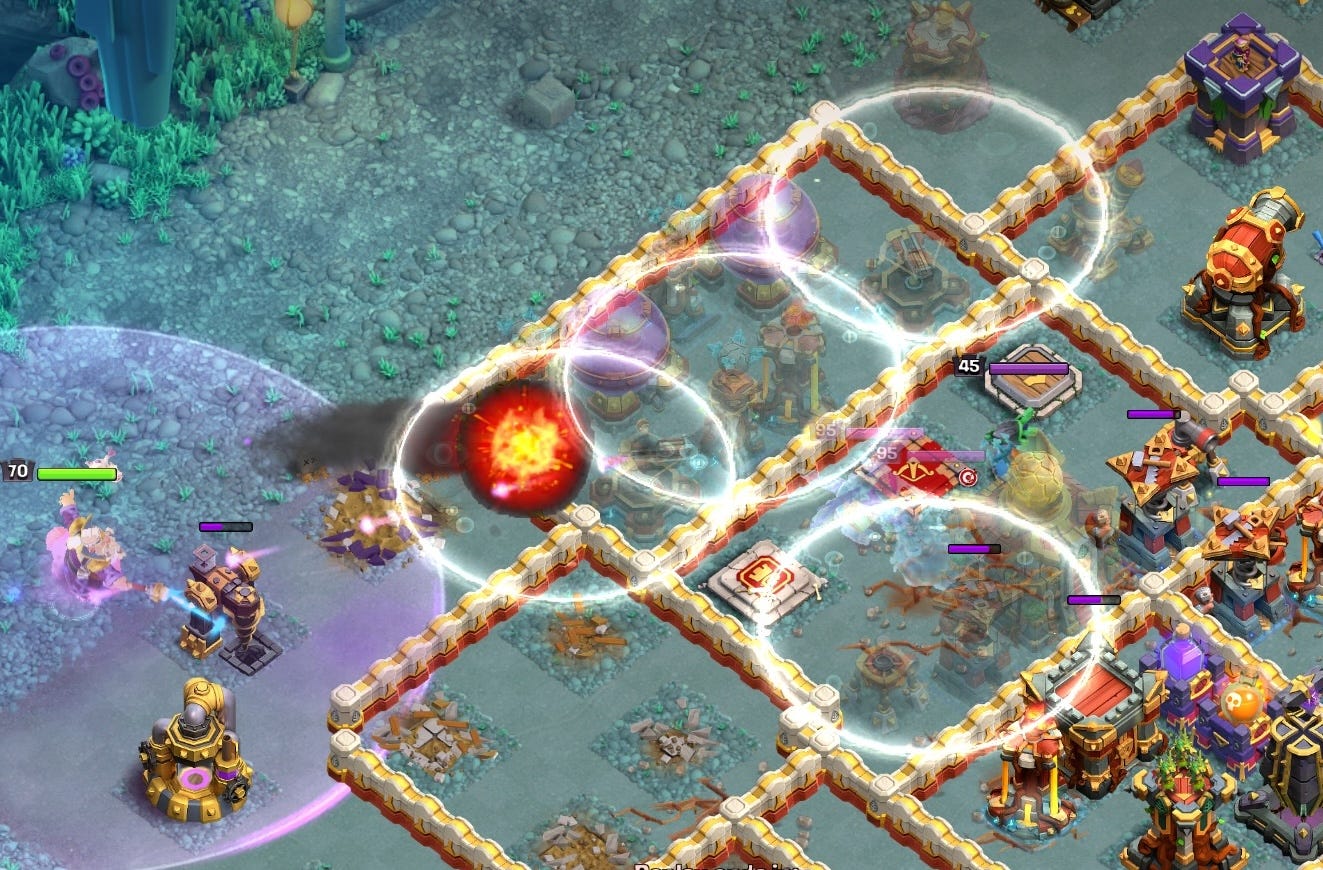
Here’s a crazy example:
💡 Tip: Find a specific building to aim at, not just a general area.
Use your earthquake spells at the same time as when the fireball lands.
Depending on the placement of builder huts, you might need to earthquake before or after the fireball. If you invis a builder hut, it will stop repairing any invisible buildings, including itself, and switch targets to a visible one.
💡 Tip: When fireballing directly in front of dangerous defenses, consider placing an invisibility spell before dropping your warden. In the following example, we drop the warden in front of two ricochet cannons and two xbows. Unprotected, he dies in <3 seconds. By pre-placing a invis, we protect our warden and also prevent luring enemy clan castle troops.

❌ Don’t do this:

There are several mistakes here. First, we missed the tesla that popped up in front of us. Second, we didn’t drop our healers or place a safety invis so our warden died early. Third, it’s not clear if we would’ve hit our target anyway. Since the game encodes Chebyshev distance (not Euclidean distance), diagonals appear longer than they actually are.

The bomb tower (= 10 tiles) looks closer from a naked eye, but the air defense (= 9 tiles) is actually closer from the game’s perspective.
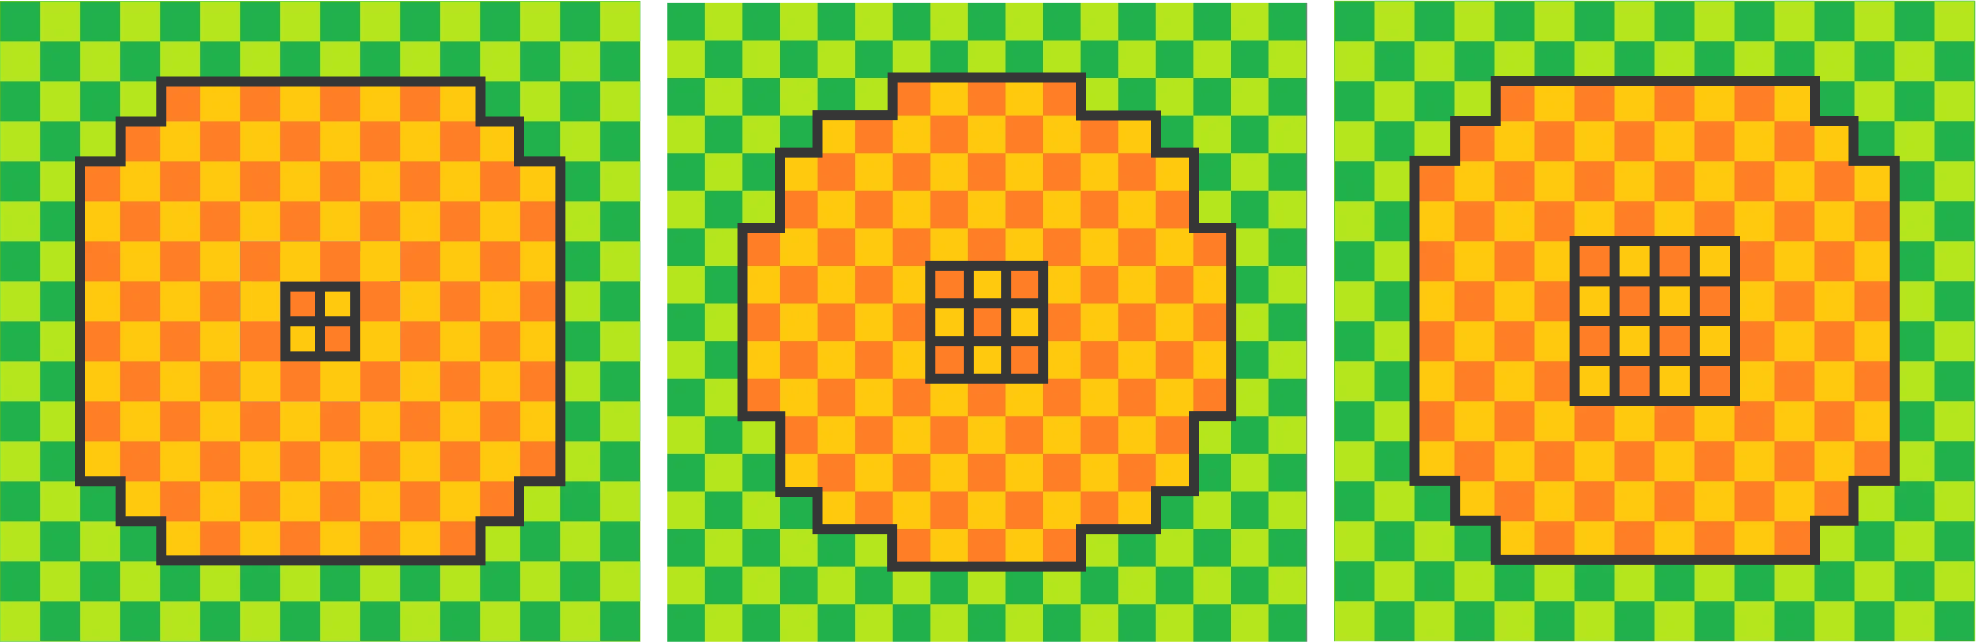
🙋♂️ What’s my fireball range?
Short answer:

Here’s an example:
We fireball the 2x2 rage tower with a smorgasbord of random defenses nearby. Any defense with at least one tile touching the orange blast radiuswill be hit.

That includes the ricochet cannon, eagle, multi-archer tower, and scattershot. Only the air sweeper is outside of the range.
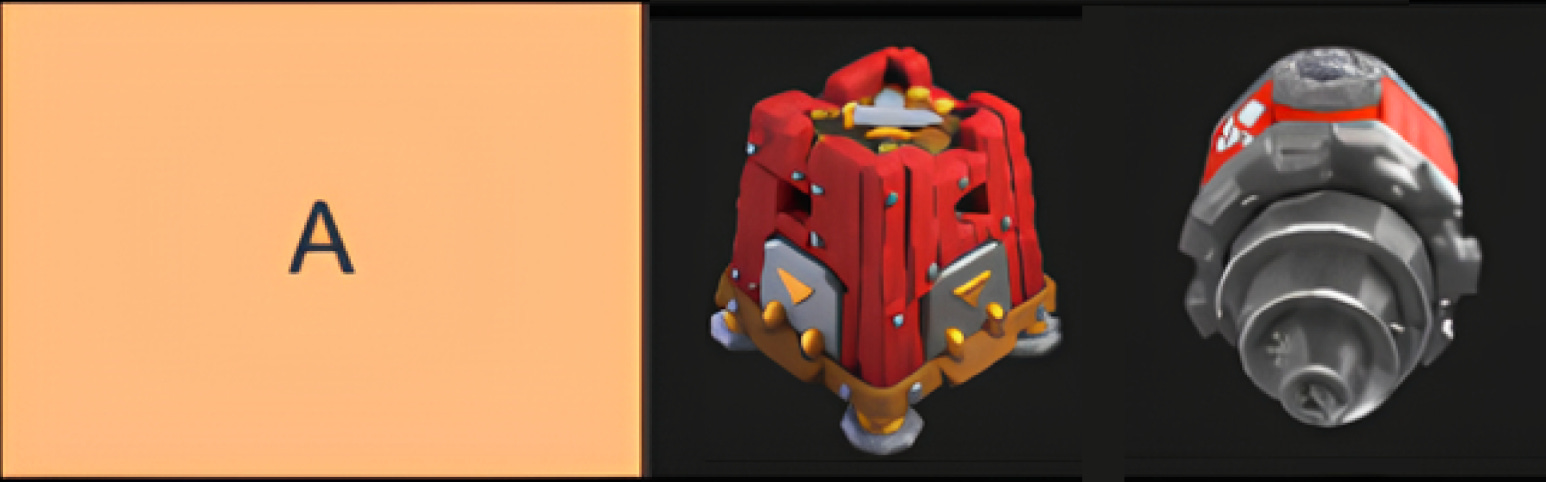
2. Choose a Siege Machine
Here is my decision process:
Q: Is there flame flinger value?

Flame flinger value is PRESENT if there are lots of defenses nearby that are NOT PROTECTED by mortars, xbows, enemy heroes, enemy clan castle, or the monolith.
To determine if there is ENOUGH flame flinger value, Leothaid has a point system:
Strong defenses like infernos/scatter/multi/rico are worth 3 points. Weak defenses worth 1 point. If you can get 5 points of value, then use the flame flinger.

^ Ricochet cannon + multi-archer tower + archer tower + air defense = 8 points of value!
When scouting, I like to use the “tactical view” feature, whereby clicking on one xbow, I can instantly see the range of all xbows, which allows me to quickly deduce if there’s flame flinger value. If not, then proceed to the next question.
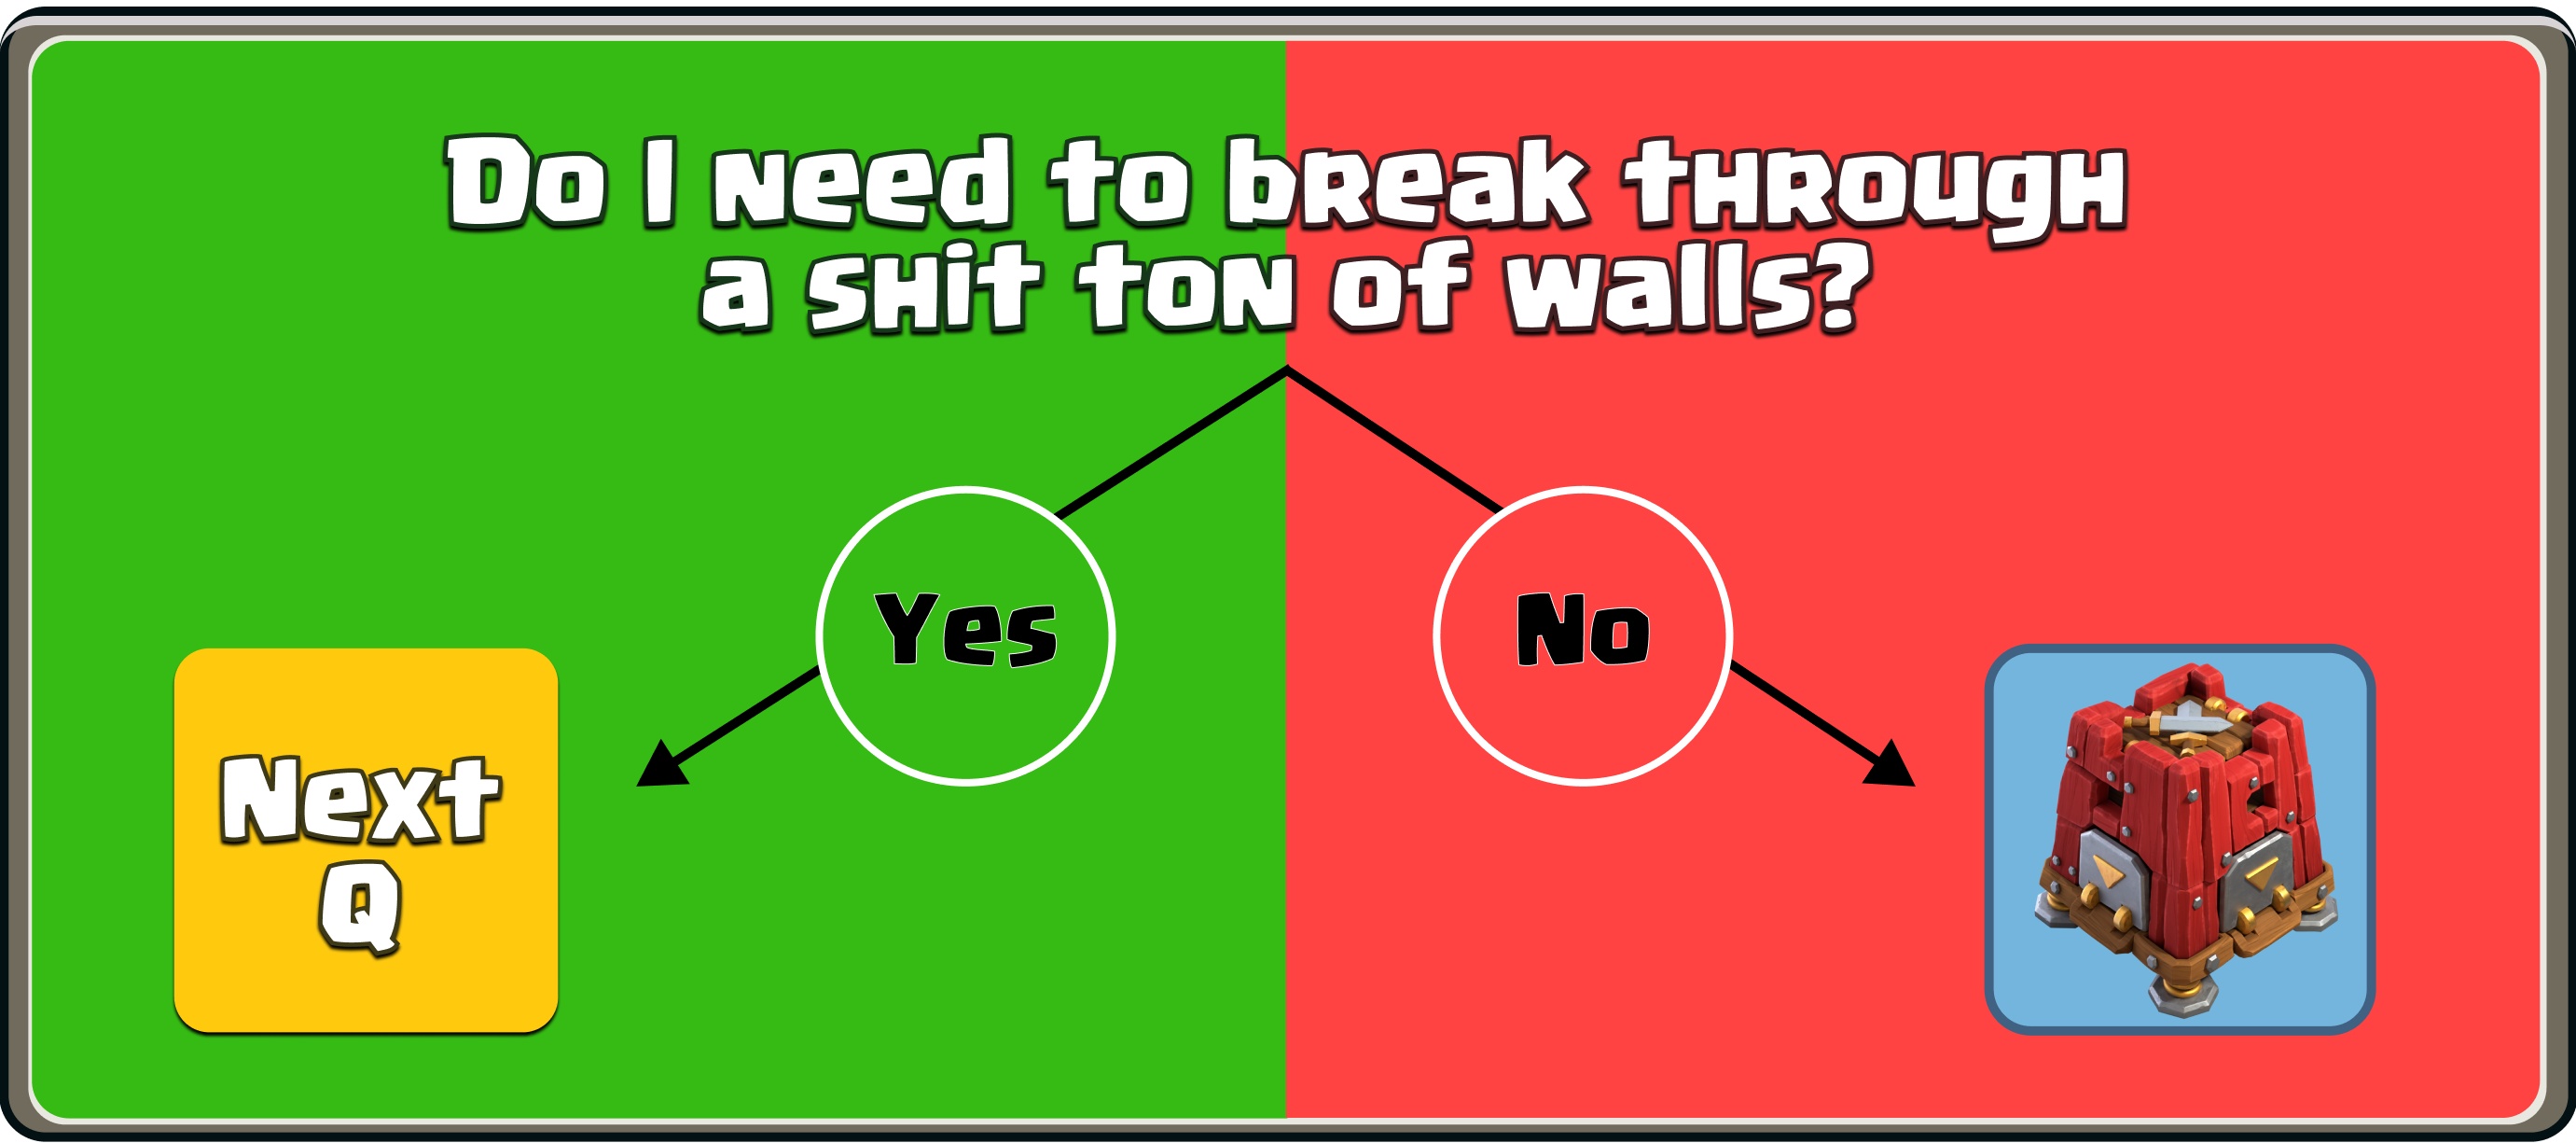
Q: Do I need to break through a shit ton of walls?

If you DO NOT need break through a shit ton of walls, then the siege barracks is likely your best bet. You can’t really go wrong with 2 P.E.K.K.As + 11 wizards as they will net value no matter what. Just avoiding sending it into a multi-inferno, because your wizards will be cooked alive. I like placing the barracks in a corner to clear out trash buildings and/or funnel, but you can also put it behind your smash for the extra juice.

If you DO need break through a shit ton of walls, then you have some better options.
Q: Are the walls arranged in a big long line?

Not the walls themselves, of course, but if multiple layers of walls can be hit by a big long line, then use a log launcher.

The further the log launcher travels, the more damage it does. Pick bases that are advantageous of the log launcher’s trajectory.
If the walls are NOT FAVORABLE to a log launcher, and you still need to break through a lot of them, then proceed to the next question.
Q: Are there heavy air-targeting defenses nearby?

If there ARE heavy air-targeting defenses (eg. air defense, enemy queen, enemy royal champion, monolith), then use a battle drill.
In the picture below, we have to break through 4 layers of walls to reach the core. Because the building are jammed right to the edge, the log launcher can’t get its full value. The drill outperforms the log launcher here.

If there ARE NOT heavy air-targeting defenses nearby, then use a stone slammer.
The slammer does more damage, has more hit points, and breaks open more walls— compared to the battle drill. It’s only weakness is single target air defenses, including black mines. The slammer can be sent on its own or together with your smash.
To recap, here is the full decision tree:


Edge Case 1: Battle Blimp
Depending on your clan castle troop, you may also use a Battle Blimp. This base has no flame flinger value (= xbow coverage is good), no log launcher value (= because we want to fireball the core), and the siege barracks and battle drill are O.K, but not fantastic. A battle blimp with a yeti-bomb can clear that single inferno and enemy hero, which will take a lot of the pressure off the hero charges as well as setting up great pathing.

Edge Case 2: Log Launcher to finish off 1hp Town Hall
Sometimes you try to go for a town hall snipe, and the town hall is left standing with 1 hp, perhaps after a builder hut repair. In this scenario, you can use a log launcher, battle drill or flame flinger to finish it off.
3. Look for Queen Walk Value

Use Case 1: Destroy a Major Defense

The eagle artillery is a major threat to our army. The yellow shaded area around the eagle is light on defenses; only the two enemy heroes can threaten our queen. By bringing an ice golem and a few headhunters, we can secure this area easy-peasy.
These examples will also be available in video in the “Replays” section.
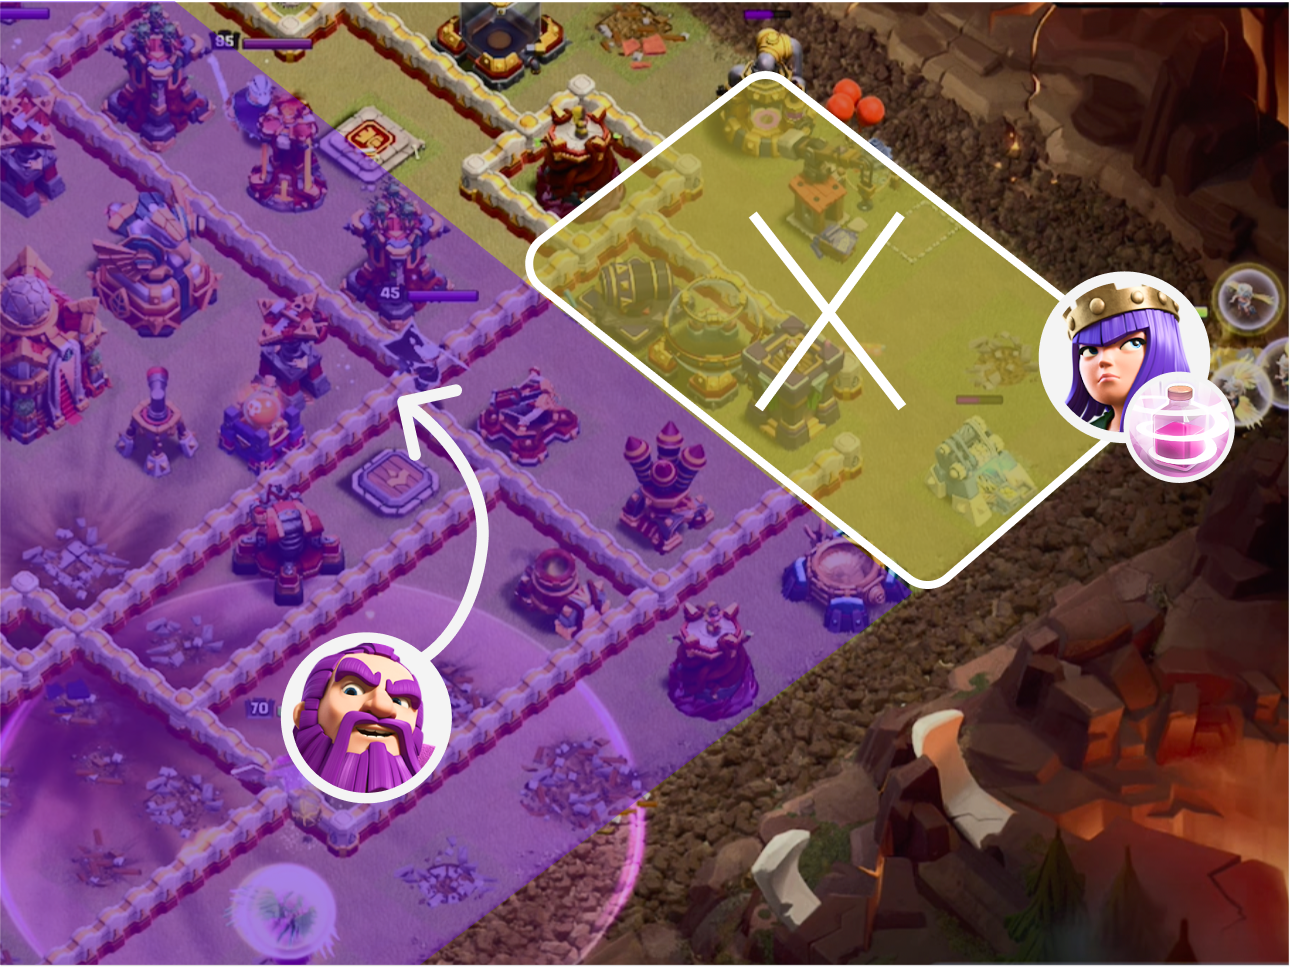
Use Case 2: Make a Funnel

The warden walks upwards toward the right corner, but he’s pretty useless up here as there are only trash buildings. If we can path him toward the core, then he can pick up more value (eg. take down the town hall and eagle). We can use our queen + recall to clear some buildings and funnel him inward.
Use Case 3: Set up a Flame Flinger

Our flame flinger can get a ricochet cannon, multi-inferno, multi-archer tower, and a poison tower. That’s crazy value.
However, the mortar behind the wall is a potential threat. We can use our queen + recall to take it down. Even though it doesn’t appear like we’re getting much out of our queen, the value the flame flinger will get will more than make up for it.
Use Case 4: The Power of the Frozen Arrow

Lastly, we can just do a plain ol’ queen charge and take out a large chunk of the base. In this example, the frozen arrow allows her to duel the enemy king, royal champion, and multi-archer tower with just the aid of 1 invisibility spell. Now that’s value!
Queen Walk Mechanics
Drop your queen and instantly press her ability to summon her three healers. Then deploy one more healer so that she has four, but don’t deploy any more since a recall spell can only cover a hero, pet and up to 4 healers. You may also want to send in a coco-loon.
Depending on which equipment you have, you may have to watch out for perimeter air defenses. They can shoot down the healers if you’re not careful. Remember, healers spawn around the queen, not behind her. With the giant arrow, you can easily snipe the air defense in front of you, but with frozen arrow, you don’t have that luxury. What you can do instead is delay activating the queen ability until after the air defense is destroyed.
Don’t deploy her too close to the warden, or he will follow her. And don’t charge her too deep into the base where she’ll take too much damage as we don’t bring many spells to support her. Ideally you want to use 0 spells during this phase (excluding the recall), but I’d say a maximum of 3 spell slots (1 rage + 2 invis) if you can get crazy value. And don’t worry if you miss a defense or two. You’ll be able to pick it up in the next phase of the attack.
For beginners, I recommend starting this phase after you’ve confirmed your warden is safe. Often, players will rush both the warden + queen walk at once, which results in excessive multi-tasking and one of their heroes dying as a result.
When do you recall? And why do you recall?
You recall her after she has gotten her value or when the damage she is receiving exceeds her rate of healing.
Because there’s a spell delay animation, it’s easier to recall her while she's hitting a building vs when she’s on the move, especially when there’s an air sweeper blowing the healers back.
The reason we recall is because we can perform 60% of a queen charge before the eagle activates. That is a big deal because once the eagle is on, it becomes harder to keep your heroes alive. Essentially we’re chipping away at the base. This phase will also prevent us from time-failing— as a solo-warden walk is often too slow.
Where do you redeploy the queen?
Replaying the queen is fairly straightforward. You can either opt for a second queen walk similar to the first one or send her in with your smash. Take your time when re-deploying her. Once you drop her, she’s usually off on her own, so make sure she heads toward safe spots.
Dual queen walks are a key part of this army. They’ll net you a huge chunk of the base if you choose good spots, and help you avoid the dreaded time-fail.
4. Where to send in your smash
By now, you’re about 1 minute 30 seconds into the attack. You look down at your troop bar and you see a crap ton of troops remaining…
Time to send them in!

Note: 1m 15s remaining is the latest time for this stage of your attack. This is also when the eagle artillery should activate (& not before).
Generally, you want to direct your smash away from the warden and toward the core. If the eagle is still up, then that is a great place to begin. Rarely do you want to merge your smash with the warden, unless the warden has already achieved its maximum value. And sometimes you might merge to pull the warden backward out of danger, but that is the exception, not the rule. A good rule of thumb is to attack directly into the heaviest-hitting defense remaining.
Deploy your king, ice golem, root riders, e-titan, and yeti. Don’t place them all on the same tile. Spread them out over a few buildings, but just make sure they converge to the core. Use as many super barbarians as necessary for this to happen.
Sometimes, you want to separate the king from the smash. Usually in cases when he has the Giant Gauntlet + Rage Vial and there is an easy compartment he can clear by himself. If you have the Spiky Ball, then you want him with your main army.
During this time, keep tabs on your warden and queen. You might find yourself pausing in the middle of the smash deployment to place a safety invisibility spell for your queen or warden. That’s alright. No need to rush this part. Just finish when you have the chance.
Overgrowth the town hall. Or if the town hall will fall to one of your heroes, then overgrowth the next largest group of remaining defenses. You can also overgrowth to funnel, redirect your fireball, or save one of your heroes.
Lastly, sit back and watch where your troops go. Use the Giant Gauntlet ability when he’s near enemy heroes or a large group of core defenses. Use the Spiky Ball at the end to clean up the last remaining buildings.
4. Where to send in your royal champion
If you have the rocket spear equipped, then you have a few options. (A) clean up defenses that your troops missed, (B) put her ahead of your smash / heroes to funnel them in a particular direction, (C) send her behind your smash for extra DPS, (D) take down an exposed town hall.
Or (E) go for the Ssip Chang Fa Ball …
5. Optional: Ssip Chang Fa Ball
Ssip Chang Fa Ball was invented by pro player Invincible LG and it’s basically a royal champion rocket spear + recall into a town hall snipe. I recommend watching a replay to get a sense of what it is.
Basically, we use the rocket spear to take out some defenses on one side of the town hall. Then, we recall the royal champion, and damage the town hall with our fireball and giant arrow along with 3 earthquake spells. That should clear the town hall and surrounding structures, and create a large hole in the base, from which we can funnel our troops around.
Example:

The xbow is a fantastic fireball target because it’s in range of the town hall, monolith, and enemy clan castle. We’ll use our rocket spear + an earthquake spell to clear out the defenses in front of the xbow, then recall our royal champion and use invisibility spells to guarantee the fireball onto the xbow. Then giant arrow right after to take it down. There are 5 builder huts in range of the town hall so make sure to earthquake beforehand so the huts repair themselves and not the town hall.
To fit this technique into our arsenal, we’ll need to make a few adjustments to our army. First, bring the giant arrow instead of the frozen arrow. That will make our queen walks slightly less strong, but it may be worth it depending on your playstle. We’ll equip the Frosty on the queen to compensate, thereby freeing up the Unicorn, which we can put on our warden.
Second, we’ll need to bring an additional earthquake spell. An earthquake pairs very nicely with the rocket spear and the spiky ball. We bring 4 earthquakes in total (& drop 1 freeze spell), and allocate 1 for the rocket spear and 3 for the town hall.
The third adjustment is the followup smash. Once you snipe the town hall, you often want to merge your warden with your queen and smash. This is because the ssip chang fa ball takes a bit of time to set up (~45 seconds), so you won’t get the full value from an extended warden charge. Therefore it’s better to boost your smash with the rage gem. The fireball creates a big hole in the base, and you can usually path your troops in an U-shape configuration around the rest of the base.
Link to adjusted army: https://link.clashofclans.com/en?action=CopyArmy&army=u6x7-2x110-1x95-2x58-1x97-4x12-1x23-5x26-3x5-2x28-1x82-2x10-5x1-1x0s1x53-4x10-3x35-1x70
💡 Tips:
Drop your queen CLOSE to your warden OR ELSE he will follow her.
Damage ALL builder huts BEFORE you fireball… UNLESS all builder huts are destroyed BY the fireball. BE CAREFUL about invis’ing a builder hut— it will start repairing the closest VISIBLE building.
Base Identification + Strengths & Weaknesses
The strength of this army lies its versatility. You can pick apart any base: sparse, dense, box, ring, diamond, invisibility island, rage / poison core, anti-2, anti-3 — and optimize your army accordingly.
Regarding weaknesses, I like to think in terms of margin of error. You can triple any base with Quad Heroes, but some bases give you a lower margin of error, meaning you can make fewer mistakes before your attack results in a fail.
Here are some aspects of base design that are challenging for Quad Heroes:
Major Counters
Single-Target Infernos
Low Fireball Value
No Flame Flinger Value
Multiple Clusters of “Hero-Killing” Spots*
* A Hero-Killing Spot (HKS) is a grouping of defenses that requires you to use a spell to get past them. They may be different for your warden vs queen. For example, the enemy archer queen is a HKS for the warden (but not for the queen), whereas the monolith is a HKS for the queen (but not for the warden, unless on Hard Mode). Other HKS include: 1 single-inferno, 1 multi-archer tower + 1 xbow, and 1 ricochet cannon + xbow.
Minor Counters
Wall Formations (Closed Compartments + Dead Zones)
Super Minion and/or Headhunter Clan Castle
Especially next to rage towers
Tesla Fireball Baits
Centralized Eagle Artillery
Easy bases for Quad Heroes are simply the reverse of everything above. Multi-target infernos barely tickle your troops (unless it is under a rage tower effect). Centralized air xbows let up massive flame flinger value. A lurable clan castle with triple ice golems pose no threat. Nor does sparse defenses, poorly placed traps, and a wall structure that crumbles with a single wall breaker.
Easy Base 1
This base has two exterior stacked invisibility compartments, make it super vulnerable to any fireball army.
After we fireball one of them, we’ve neutralized a significant portion of the bases’ defensive capabilities. The base can no longer defend, and we can walk our way to a 3-star.

Easy Base 2

The defenses on this base are too spread out to be effective. Anywhere our hero goes, they’ll have only one major defense targeting them at a time. Therefore they will never die, and they can walk through the base unscathed.

Now let’s look at some hard bases.
Hard Base 1

This base has 3 single infernos that are relatively hard to reach. If we’re not vigilant, then our heroes can easily die. Xbow coverage is good except at 9 o’clock, but that’s obviously baited with traps. The town hall compartment is the best place to fireball, but it’s hard to reach.
Additionally, there are multiple Hero-Killing Spots across the base, which forces you to continuously invest spells and you might run out eventually.

Hard Base 2:

Again, 3 single infernos, and the xbow coverage is even better than the last one. Normally I can snipe an xbow with a queen walk + recall and deploy a flame flinger afterward, but these xbows are so deep that it’ll probably take too long for it to be worth it. And like the previous base, the best place to fireball is the town hall, but it’s hard to land it there.
Lastly, the wall structure is a bloody moat! Our troops will likely circle around the core (unless you’re running earthquake boots), while being slowed down by poison towers and bombarded by scattershot shells. There is also a decent risk of time-failing if we don’t manage to break open the walls fast enough.

Hard Base 3:
This base is hard for different reasons.
First, even though the xbows are set to air mode, there still isn’t much flame flinger value.
Second, the natural thing to do is warden-charge the town hall. He can take down the monolith + town hall by himself. The problem is what happens afterward. If you count, there are 7 storages on the top side. Add any potential tesla farm, skeleton traps, or tornado traps, and your warden can be stuck on the top side of the map for the entire attack, leaving you with too little firepower for the rest of the base.
The wall structure is also tough as we have to get through three layers of walls to access the core. And once we do so, imagine 3 ice golems pop out of the enemy clan castle and freeze our army for 15 seconds while 3 single infernos are beaming down at them. Not great.
Putting it All Together (w/ Video Replays)
I’ve compiled 13 hits for you guys. A mix of replays and live attacks (+3 on hard mode). I’ve tried to arrange it from most simple to most complex, and have each one build on top of another. There’ll be a mix of siege machines, pets, and base layouts. My goal is for you to learn something new from each attack.
Note: Some of these hits were from previous patches, so the army may be slightly different, but I kept them in because the principles and techniques still apply.
Enjoy!
Base 1 - Double Stacked Compartments
These types of bases are super easy for Quad Heroes. All you have to do is fireball one of the stacked compartments, and have a plan for the other. On this base, I noticed there are air xbows near the center, making it perfect for a flame flinger.
So the plan is:
Fireball 1 stacked compartment
Flame flinger the other stacked compartment
To finish the rest of base, I will send my smash at the largest remaining defense (the monolith), and overgrowth the eagle upon entry. If all goes well, then we will have overwhelming force converging at the town hall.
In the replay, notice how I take out the tesla farm near where I wanted to drop my flame flinger. You’ll need to learn how to do this effectively.
Clan War League | Replay | Normal
Base 2 - Single Stacked Compartment + Single Infernos

There is a single stacked compartment on the bottom right side. We can fireball it and let the warden walk around.
Single infernos are pretty scary for our army. We can dedicate a siege for one of them, and send our smash at the other.
Lastly, the eagle is exposed on the outside, so we can easily scoop it up with our queen + recall.
Clan War | Replay | Normal
Base 3 - Isolated Town Hall + Invisibility Tower + Log Launcher

Similar to the last base, this one also has a stacked invisibility compartment on the bottom-right and an exposed eagle on the top-left.
But the town hall core is very isolated and protected by an invisibility tower. Therefore we can use a log launcher to push through to the core as well as pre-trigger the spell tower.
We’ll use our overgrowth as a funneling tool.
Clan War League | Replay | Normal
Base 4 - Edge Town Hall + Supersize Smash
Town halls near the edge of the base can be easily scooped up by one of our heroes.
On this base, we’ll deploy both our queen and warden to that area, one from 6 o’clock and the other from 3' o’clock. Hopefully, one of them can take down the town hall.
For the top half of the base, we’ll deploy a full-power smash: three heroes (king, redeployed queen, royal champion) + a siege barracks to sweep through the base.

Friendly Challenge | Replay | Normal
Base 5 - Godlike Fireball + Double Poison Core

At first glance, this base looks awful for Quad Heroes. Multiple single-infernos. A core that is difficult to path to. Well-positioned defenses around the perimeter.
But there’s an absolutely crushing fireball spot. Can you spot it?
Answer: It’s on one of the ricochet cannons. Land a fireball here and you’ll hit the eagle, clan castle, single-inferno, and enemy hero. And set up an incredible funnel.
Game over.

Esports | Replay | Normal
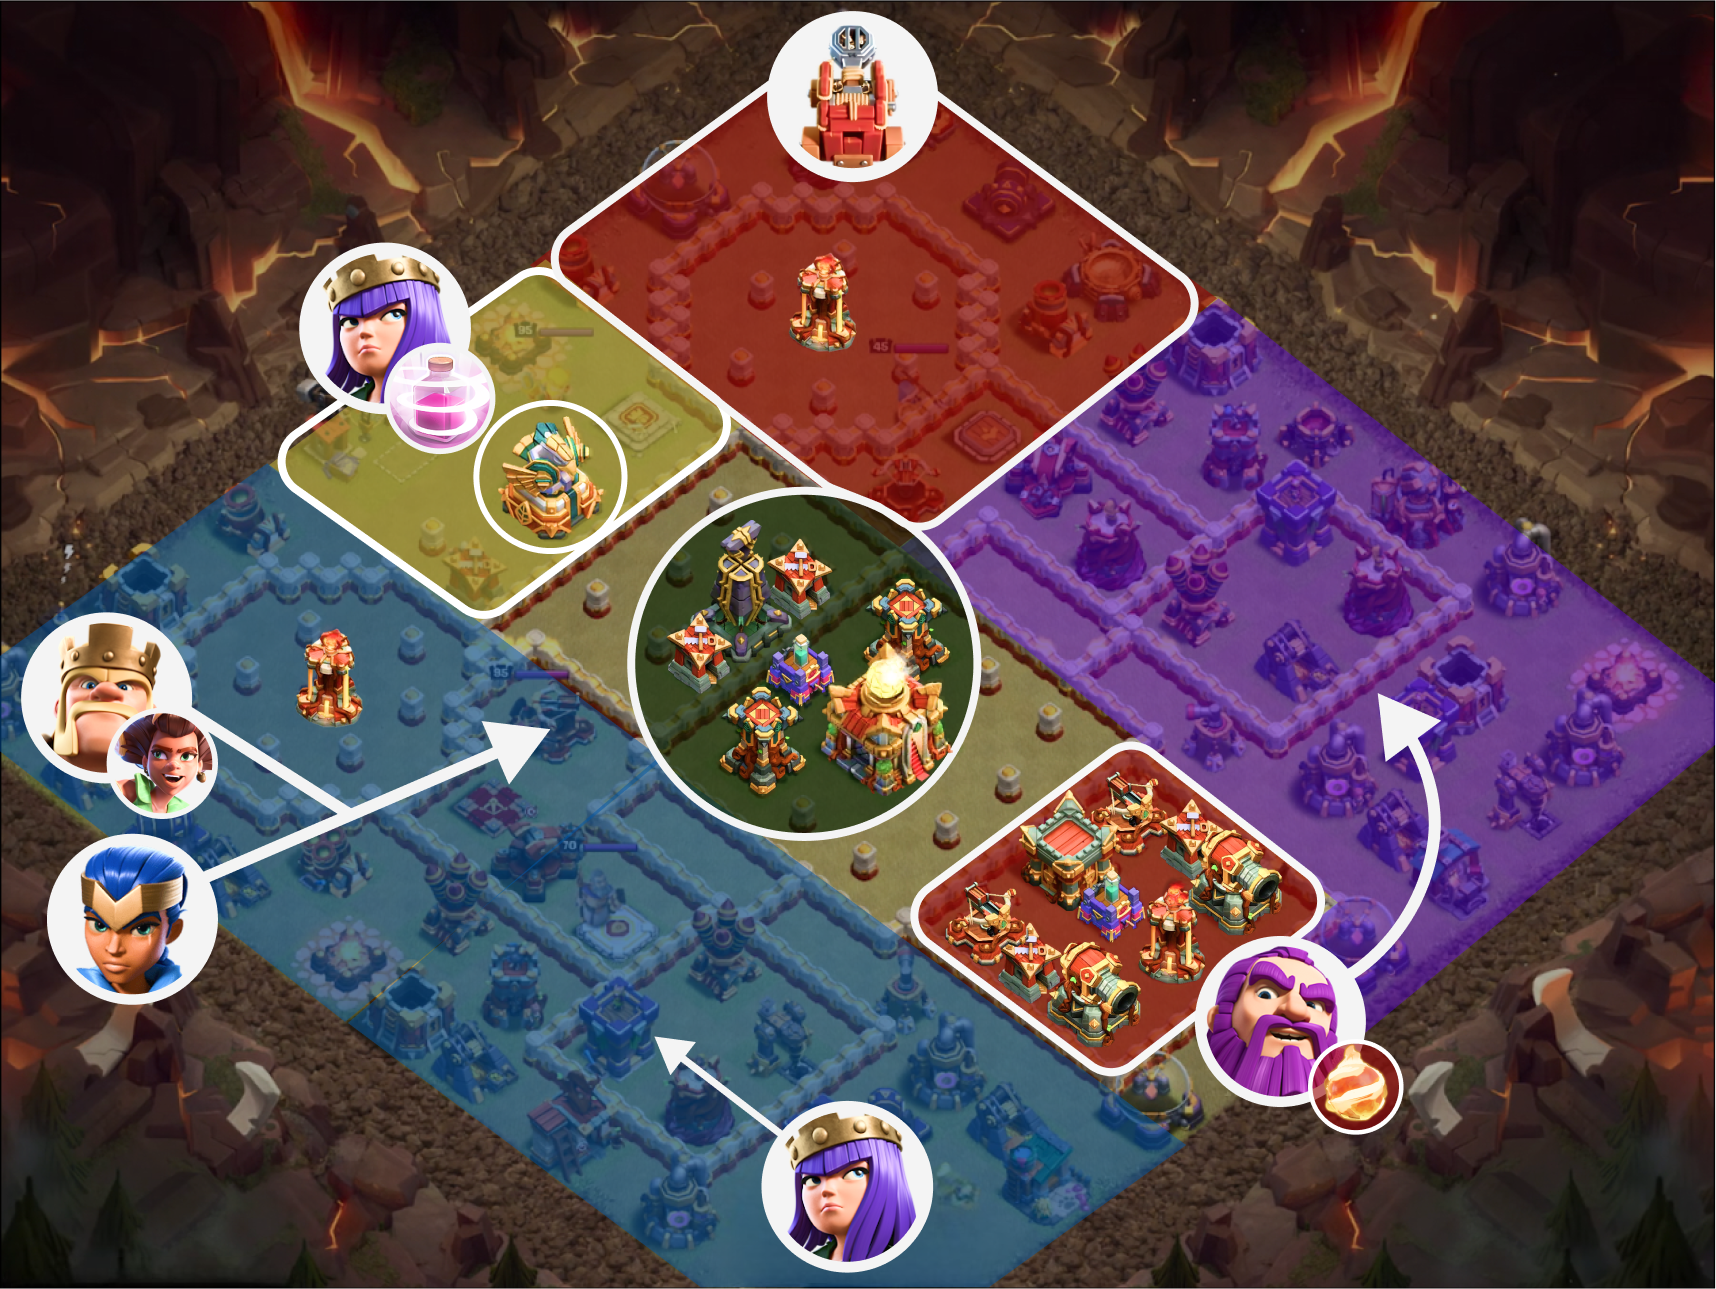
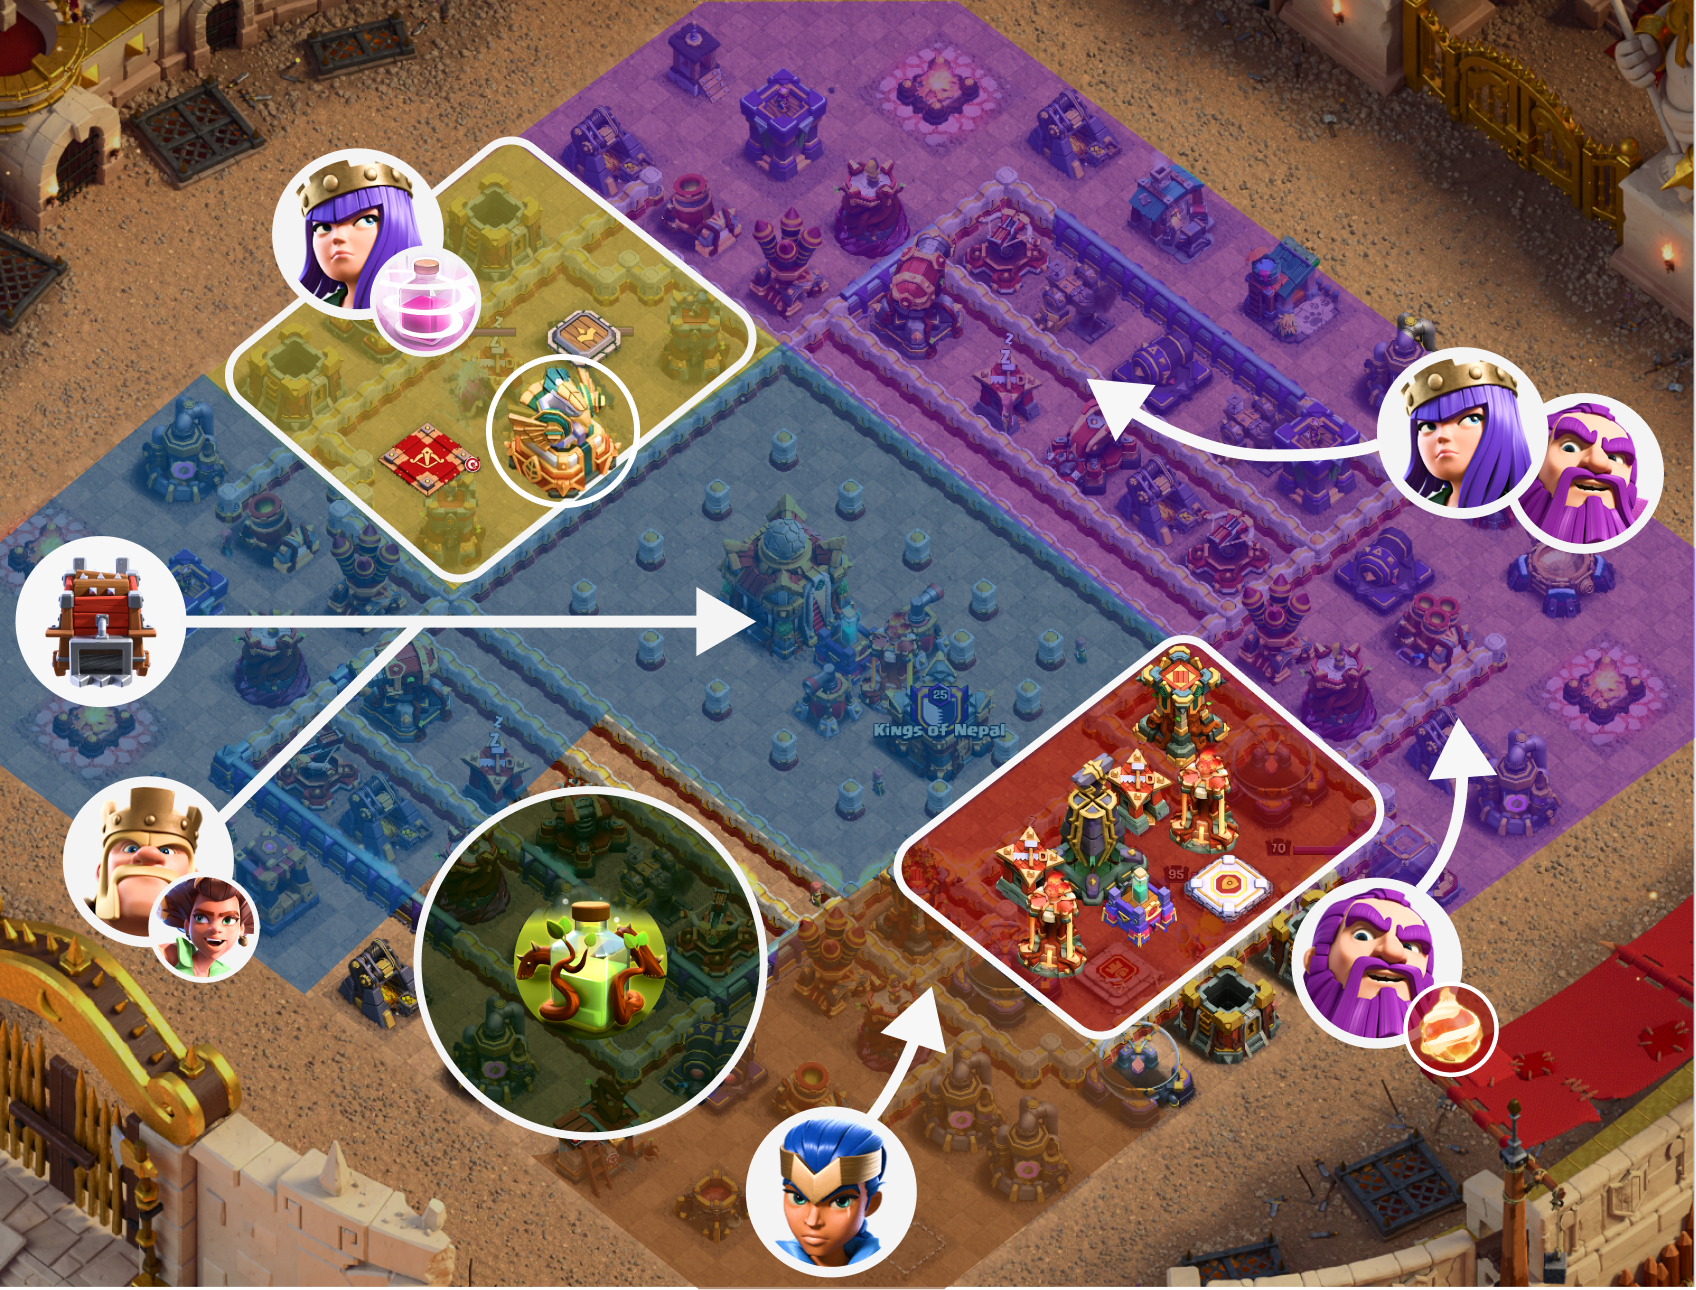
Base 6 - Surgical Hit + Battle Drill
This was an attack I performed in the Global Clash Cup (= esports). Although it wasn’t an overkill, I like the hit because of its surgical nature. You can really get specific, and dedicate “just enough troops” for each part of the base. This style of approach will certainly get your heart pumping!
And here is a post-attack reflection that I shared with a clanmate:
My goal with this attack was to shoot a fireball either onto (1) bottom right multi-inferno or (2) bottom left builder hut (below cc).
Mid-way through the attack I realized I'd have to spend 2 invis spells to target the builder hut so I settled with option 1 (the multi-inferno).
For this strategy, you don't need massive value w/ fireball. (Also why I like it as it's not dependent on fireball). Setting a funnel is good enough.
The eagle can be an annoying defense, as it deals 65% of your warden's hp in one strike. I realized that area was light on defenses, so I sent my queen + recall to pick it up.
Now I had two "plans". If warden walks left, I'd place my queen on the right side. If he walks right, I'd place my queen on the left side.
My king + smash would go straight into the ricochet cannon (the highest hitting remaining defense). RC + drill to set funnel & clear the top compartment. I originally planned to overgrowth the TH + monolith, but noticed my warden in that area, so I opted for a smaller overgrowth instead.
Rest is spell placement. I knew I needed a rage for the warden if he's under fire from an xbow + ricochet cannon. I typically look for flame flinger value, as it's the best siege, but on this base the xbow coverage was good.

Esports | Live | Normal
Base 6 - Angry Jelly + Jump King

The angry jelly + jump king is one of the strongest modifications you can make with this army.
It doesn’t work against all bases, which is why I don’t include it in my standard army.
With the jelly + jump, you typically want to pair it with the giant gauntlet + rage vial combo.
On this base, send him to clear out the left compartment by himself. The reason we use the jelly + jump is because that area has a lot of trash buildings, and I’d prefer not to spend 40 housing space to funnel my king.
The rest of the base can be picked off by our heroes. Fireball the bottom. Queen charge the top. Direct our smash at whatever is remaining.
Clan War | Live | Normal
Base 8 - Deep Fireball + Sui* Royal Champion
*Sui refers to sui-ciding your heroes at the beginning of the attack.
These types of bases with an isolated stacked core can be hit or miss. Either you fireball the core and crush the base or miss and get a 1-star.
To guarantee the fireball on the core, we have to first decide from which side to fireball from. I chose the top-left because it has the lightest defenses. By fireballing from the 10:30 o’clock side, it means we have to funnel the 9' o’clock and 12 o’clock side.
It doesn’t matter how you funnel, as long as you do it. For example, you can use two overgrowth, two queen walks, or in this case, a queen and royal champion on either side. Our champion dies afterward, but that’s fine as she’ll set a clear path for our fireball.
Clan War | Live | Normal
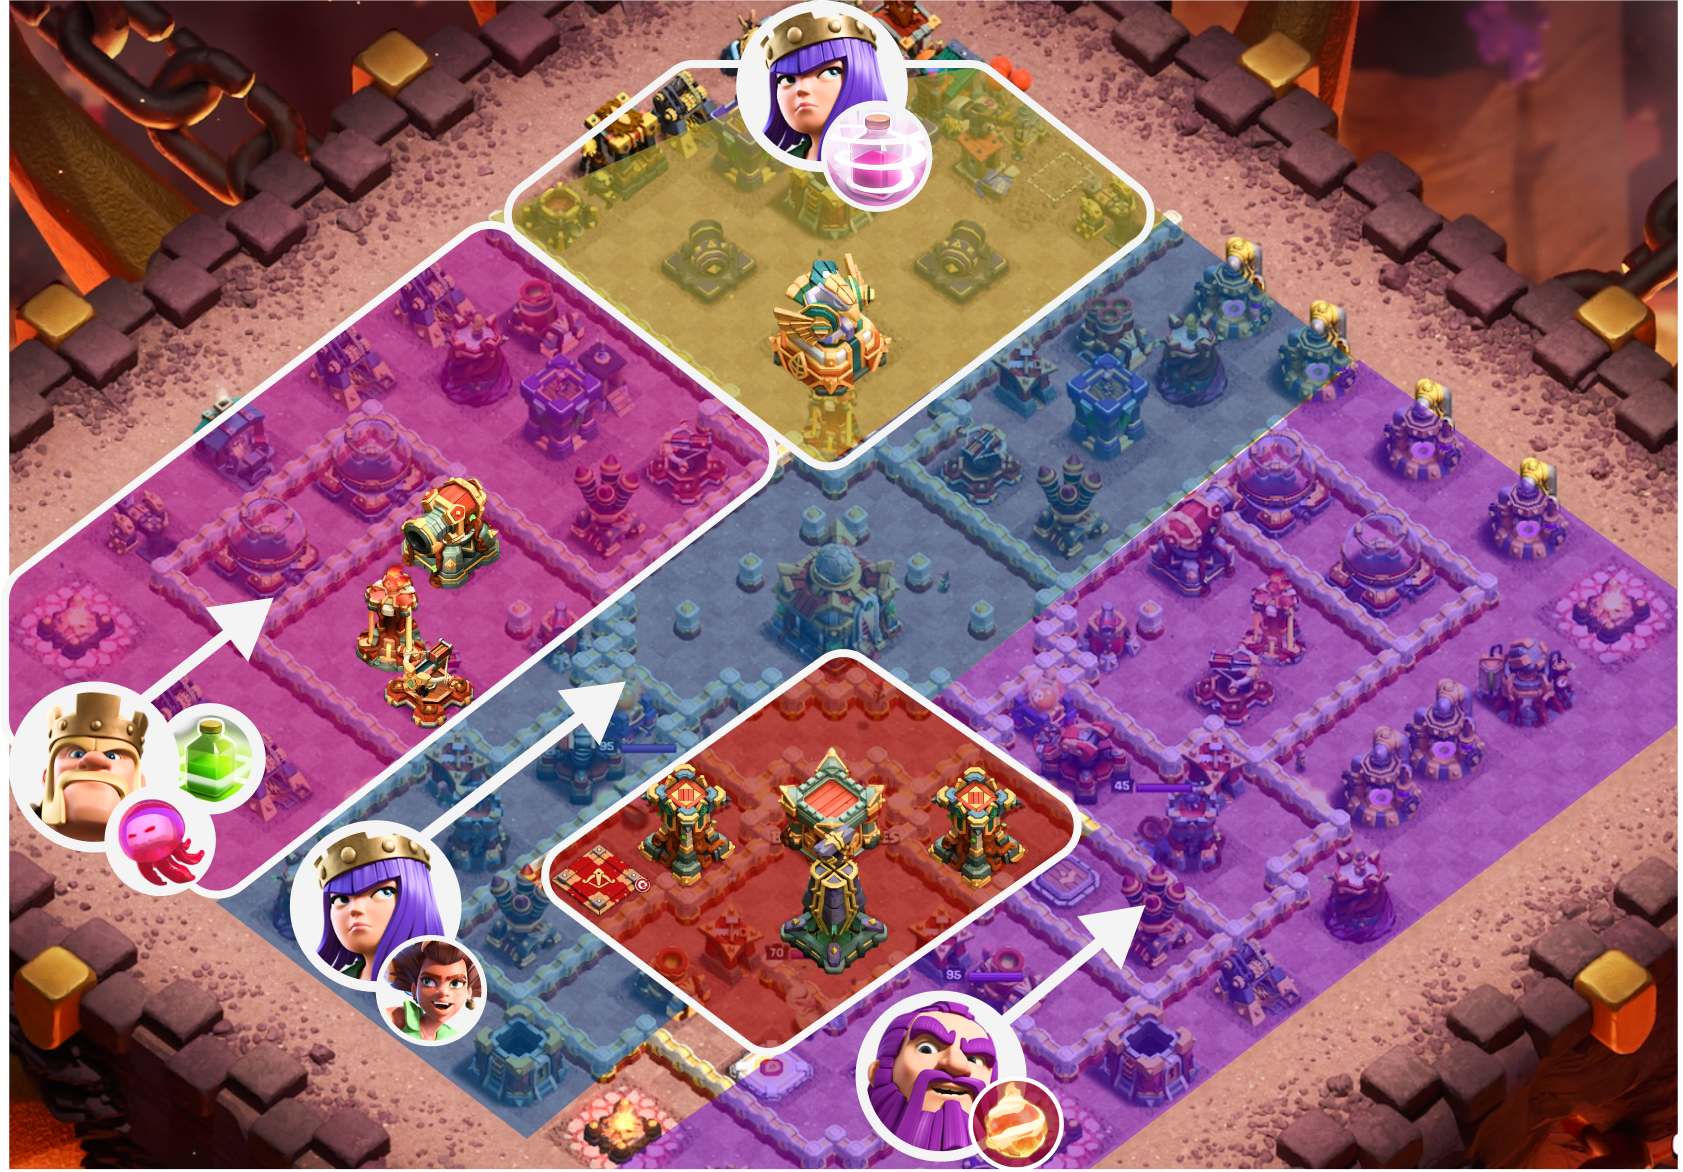
Base 9 - Ultra Compact Base
Ultra compact bases can be tricky as there can be so much damage in the core that your heroes can die quick, or your troops can get stuck behind walls for an eternity.
On this base, there’s a great opportunity to use the rocket spear + recall to take out some major defenses. For example, a rocket spear on the bottom right side will net two infernos, an xbow, and a scatter or ricochet cannon. It’ll also create a great funnel.
The battle drill is awesome on these types of bases as it’ll open up several players of walls and help your smash get through the base.
Clan War League | Replay | Normal
Base 10 - Double Hero Charge

These types of bases make it easy for us to maximize hero charge value. All the damage is in the center, and the sides are weak. We just send our warden down one side and queen down another.

As you can see in the replay, we didn’t even need to deploy our smash!
Clan War League | Replay | Normal
Base 11 - Recall Warden + Hard Mode

Two things I notice on this base:
Incredible flame flinger on the bottom eagle + multi-archer towers (IF the two mortars are gone)
Top right fireball value
By fireballing the multi-inferno, we will get both ricochet cannons and the monolith. The issue is, we don’t really want to warden walk on the top-right side. First, the enemy king is right there. Second, the warden will either walk down into the single-inferno or skirt on the perimeter where he’ll pick up little additional value.
Instead, I chose to recall him and redeploy him to the bottom. There he’ll start walking up the side, clearing an xbow and scattershot compartment.
All else being equal, it’s better to deploy your warden on the enemy royal champion side, not the archer queen side. Enemy royal champion has lower range, and the warden can usually outrange her without taking damage. In effect, it frees up attentional resources so you can focus on other parts of the attack.
Esports | Replay | Hard
Base 12 - Double Overgrowth + Hard Mode

Overgrowth is a fantastic counter against rage tower compartments.
In this attack, I chose to fireball the monolith + clan castle. I opted to bring 2 overgrowth spells for the core, dropping a recall, which means I have to merge queen and warden together for a single charge.
Note: One trick is to wait until the rage tower activates before placing the overgrowth. That way, its active effect is wasted during the spell duration. A second trick is to slowly uncover the overgrowthed area bit by bit if you are running multiple overgrowths. This ensures there’s never too much damage on your troops at any given time.
Esports | Live | Hard
Base 13 - Double Rage Core + RR Ban

Lastly, this hit is from an October 2024 esports match.
This tournament banned root riders, so I chose to sub in valkyries instead. This shows the versatility of this army, and how you can make it work even when there are banned troops or spells.
The attack is pretty crushing, so give it a watch 💪
Esports | Replay | Hard
Frequently asked questions
1. How can I fail less?
If you’re picking up the army for the first time, then you’ll likely fail a lot. Here are some common mistakes players make and how you might overcome them.
You MISSED your fireball.
a. You forgot a building → It’s ok, brush it off
b. You got baited by a hidden tesla → Unlucky. Check for traps next time or be more vigilant
c. You were too quick on the trigger. You didn’t wait for the invisibility spell to take effect. → Remember the ~1 second spell delay for next time.
d. You were too late on your spells, so warden got too low in health and went to auto-ability. → Try to anticipate when your warden will be in danger next time
Your warden / queen DIED.
a. You lost track of your heroes. You couldn’t handle the multi-tasking → It’s ok, practice and you’ll get better, OR try delaying one of your hero charges until after the other one is safe
b. You picked a bad spot. You sent your hero into a dangerous area. → Better identification next time
c. You were late on your spells → Remember the ~1 second spell animation delay.
d. You got pummeled by the eagle. You used too many funnel troops early on and activated the eagle early. → Next time, immediately start your smash. This will take the fire off your queen or warden.
You TIME-FAILED.
a. You started your smash too late. Usually 1m15s remaining the latest for this phase. With spiky ball you can maybe get away with 1m0s remaining, but you’d be cutting it real close.
b. You didn’t save cleanup troops. You missed a random building. → Make sure to zoom out and look around. Try bringing spiky ball and waiting until you see 92% (if you have 8 bounces) before pressing the ability. This equipment will shave 10-20 seconds off of the attack.
c. You overgrowthed too late. A max level overgrowth lasts for 25 seconds, and afterward you need to give your troops ~20 seconds to finish off the area you covered. ~45 seconds remaining is the latest time you should be using this spell.
2. Can you play this strategy on a tiny phone screen?
Yes!
Is it harder to keep track of everything? Maybe, if you’re doing two hero charges on opposite sides of the map. But I have clanmates who’ve found success playing on their phones, and some even prefer to play on the phone due to muscle memory and comfort.
3. Why super barbs over rocket loons?
Rocket loons have the ability to snipe interior defenses, so they are great at guiding your fireball. They can also snipe exterior defenses, saving an invisibility spell. Rocket loons are nice if you want an ultra-fast fireball, but typically in this army we can take our time and slowplay the fireball.
Here are some other reasons why I prefer super barbs over rocket loons:
They take less housing space (5 vs 8). You need 2 rocket loons or 2 super barbs to snipe an exterior cannon or wizard tower anyway. One takes 16 housing space; the other 10. Every single housing space you save delays activating the eagle artillery.
They can target any building (not just defenses), so they are superior at setting up a funnel for your troops.
They can snipe enemy heroes. For example, 4 super barbs and a headhunter can take down an enemy king on the edge of the base.
But here’s an example where rocket loons may be a superior choice.

This part of the base has 2 ground xbows, 2 ricochet cannons, 2 bomb towers, and 4 mortars. Loaded with ground-targeting defenses. Any super barbs will get picked off by the point defenses and xbows. The wall structure makes it difficult to set up any kind of funnel. Rocket loons, on the other hand, can quickly overpower this ground-targeting area.
4. Does this strategy work at lower town halls?
Absolutely!
Quad Heroes is even stronger at lower town halls because there are fewer heavy-hitting defenses. With reasonably-leveled equipment, it’s easily one of the strongest attacks in the game.
Since we don’t have access to root riders below town hall 15, we can substitute in super witches, yetis, or ice golems. We can get around the loss of wall-breaking by replacing an overgrowth with a jump spell or bringing root riders in the clan castle.
TH12 Army Link: https://link.clashofclans.com/en?action=CopyArmy&army=u6x7-3x5-9x26-1x11-1x58-1x82-1x53-2x66-3x1-1x0-4x4s1x2-2x35-1x9-3x5-1x3-1x10

TH12 Replay:
TH14 Replay:
I encourage you to experiment and find your own style. I don’t actively play Quad Heroes at lower town halls so I’m sure these are not the optimal army comps.
Best of luck!
This is the end… but your beginning…
If you’ve found this guide helpful, please pass it forward to a clanmate!
References
Fireball Range (2x2, 3x3, 4x4)
Fireball Damage Table

Spiky Ball Damage Table

Credit to Leothaid for sparking the initial idea of the strategy. Thanks Bruce, Kurz, Mike, Godly, Kaito, and Blitz for reviewing draft 1.0 of this guide.